Deploy Chat Agent
What are AI Chat Agents?
AI Chat Agents are Regal AI agents that handle real-time conversations with customers through a web chat experience.
Regal's AI Chat widget, powered by the Regal AI Agent, is easily embeddable in your website (via JavaScript). When a customer sends a message, the AI Agent responds instantly and can guide them toward resolution, conversion, or escalation as needed. Customers can interact with the AI Agent via whatever channel they prefer - whether it be chat, webRTC voice (enabled via the "Enable Voice" button), or both.
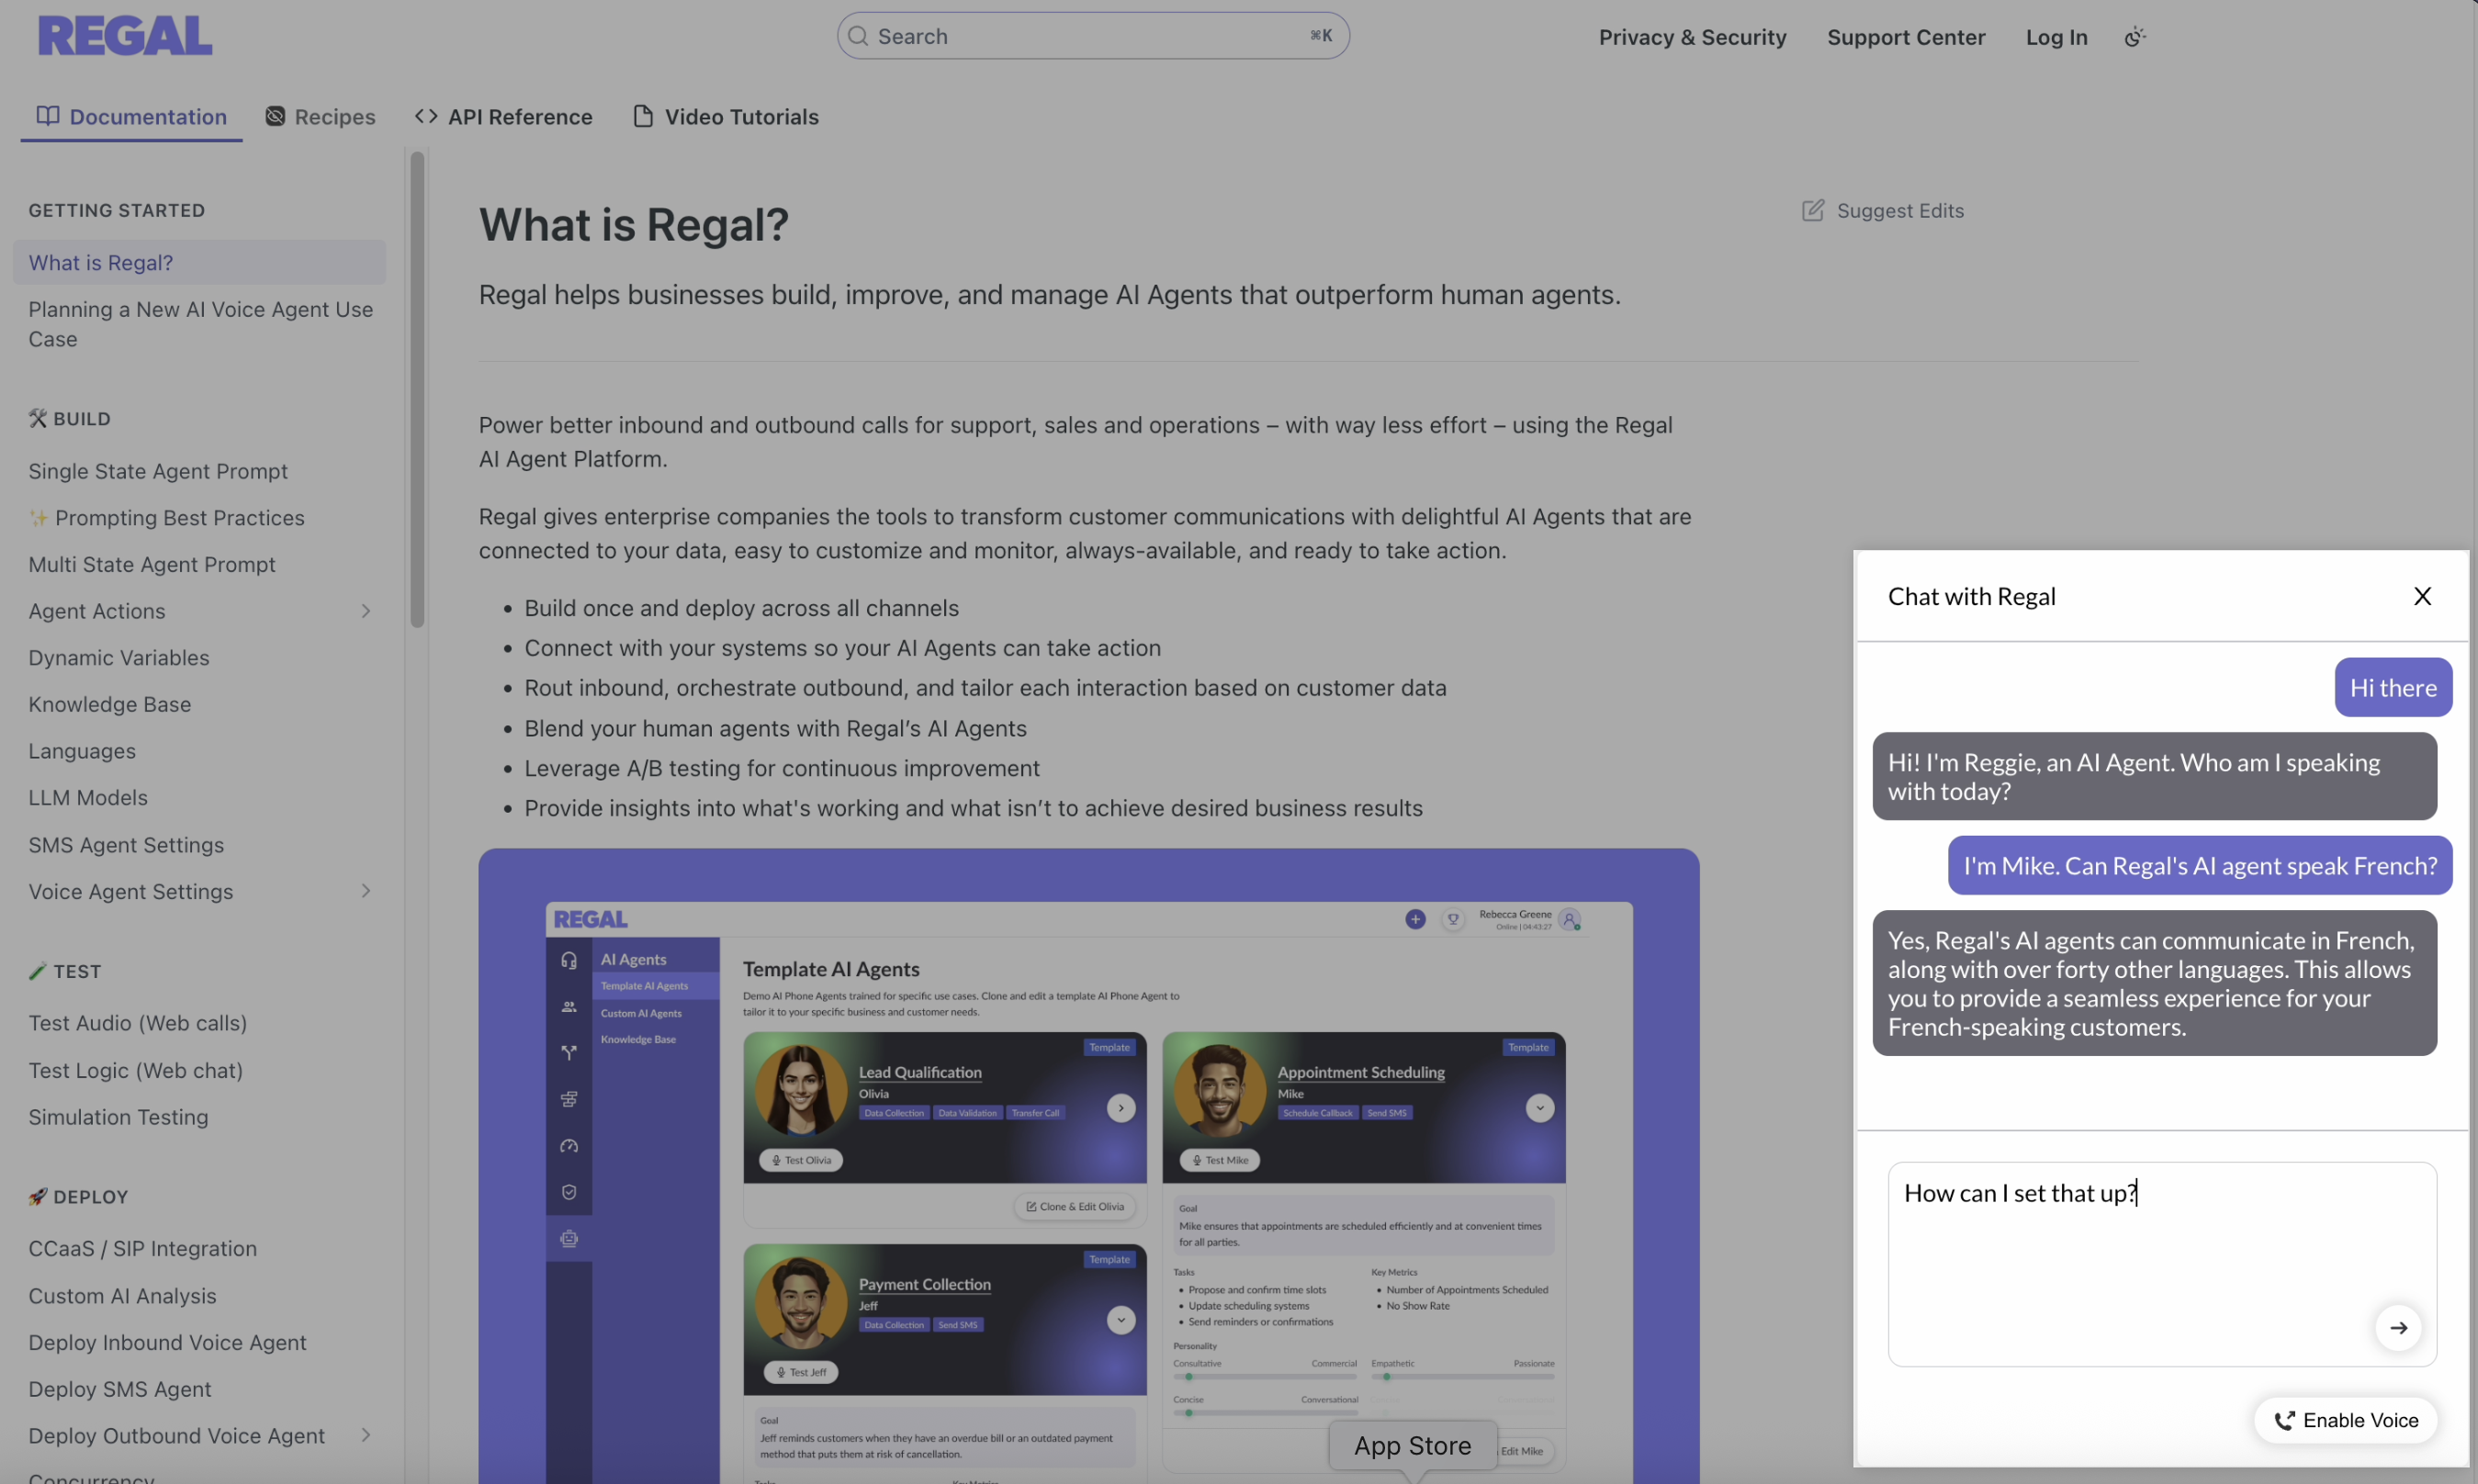
Try it yourself - open the widget in the bottom right corner of this page to chat with Reggie.
Common AI Chat Use Cases
- Customer Support & Troubleshooting
- Resolve customer issues quickly with dynamic troubleshooting directly from your website.
- Onboarding & Setup Guidance
- Guide new users through setup and feature discovery as they navigate your product, reducing friction and improving activation.
- Appointment Scheduling & Follow-ups
- Collect required information and assist customers with booking demos, consultations, or support callbacks.
- After-Hours Coverage
- Handle inbound conversations outside business hours so customers always receive an immediate response.
- Lead Qualification & Sales Intake
- Engage inbound visitors, ask qualifying questions, and route high-intent leads to sales or booking flows in real time.
Deploying AI Chat Agents
1. Create your SDK instance
- Share the whitelist of origins (domains where the widget will run) with your Regal Forward Deployed Engineer. Use your full origin format (https://www.example.com).
- Regal will create your SDK instance and return your SDK Instance ID, which you’ll use during widget initialization.
2. Add the script tag to your header
Add the Regal widget SDK script tag inside the header of your website:
<script src="https://cdn.regal.io/conversations-sdk/production/regal-widget.js"></script>3. Initialize the widget in the body
At the end of your body, add the following script tag to initialize the widget with your brand and agent details.
<script>
(function () {
function initRegalWidget() {
window.RegalWidget.init({
apiUrl: 'https://api.regal.ai',
brandSlug: '...your brand slug...',
agentId: '...the UUID of your agent...',
widgetHeaderText: '...your desired widget header...',
sdkInstanceId: '...the SDK instance ID...',
// Optional:
// pageVisibility: { whitelist: [{ type: "url", value: "https://..." }] },
});
}
window.addEventListener('RegalWidgetLoaded', initRegalWidget);
if (window.RegalWidget && typeof window.RegalWidget.init === 'function') {
initRegalWidget();
}
})();
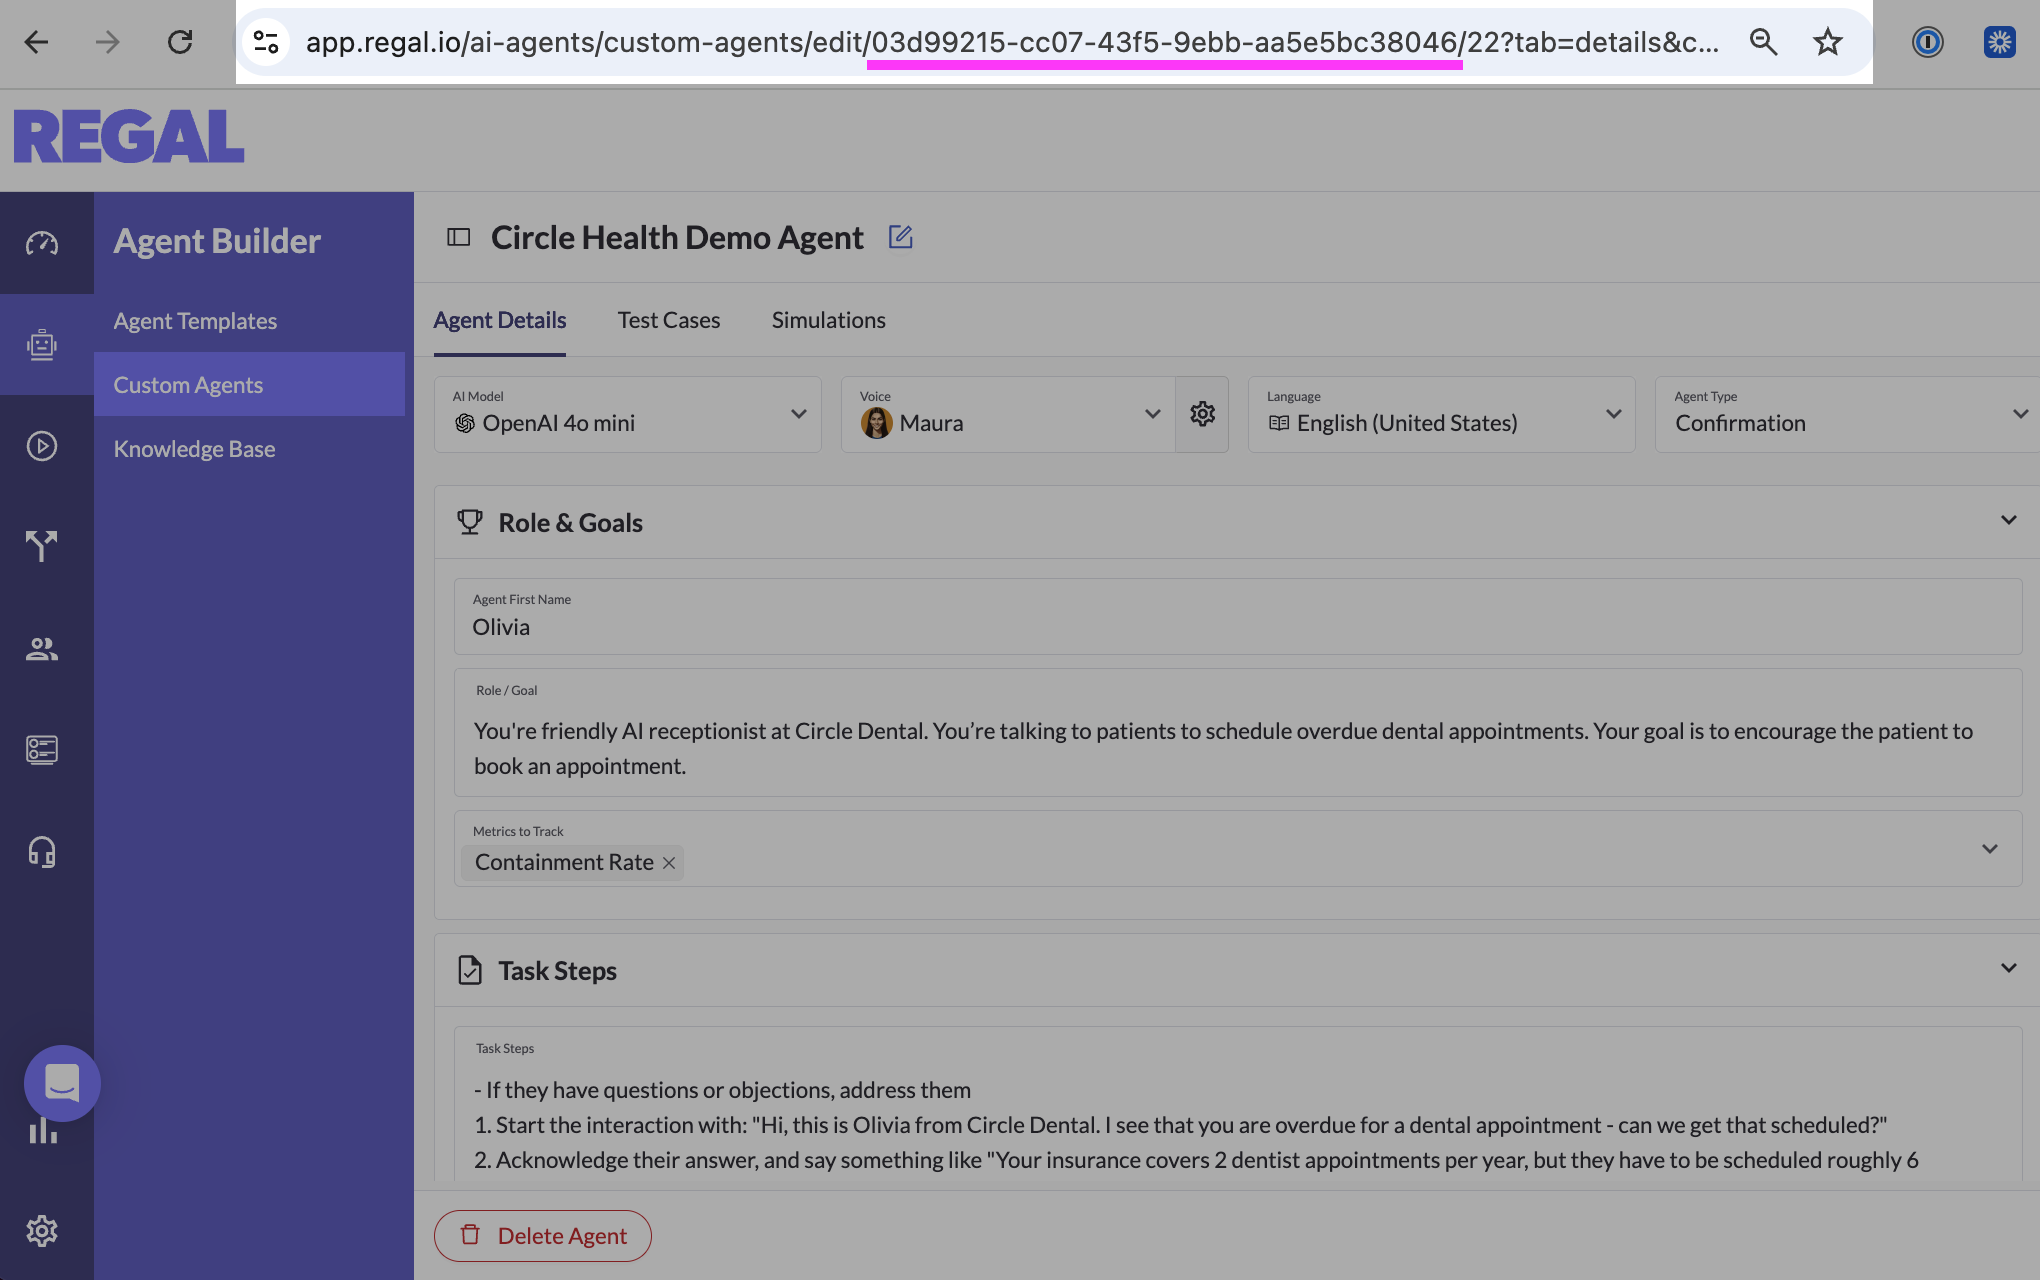
</script>Your agentId is the unique identifier of the agent powering your widget. To find this quickly, navigate to your desired AI Agent in the Agent Builder. The URL for this page contains your agentId (a string of characters). In the below example, the agentId is 03d99215-cc07-43f5-9ebb-aa5e5bc38046. Reach out to your Forward Deployed Engineer for help.
Once initialized, chat messages are automatically routed to the specified AI Chat Agent.
4. 🚀 You're live!
Once deployed, visitors can immediately start chatting with your AI Agent, and conversations will flow through Regal just like any other channel. From here, you can iterate by:
- Monitoring conversations and outcomes in Regal Reporting
- Refining agent instructions and prompting
- Enhancing knowledge base coverage
Your AI Chat Agent is ready to meet customers where they want to be met - quickly and easily.
Methods
Initialize the widget
RegalWidget.init(config)
Mounts the widget and applies configuration (API URL, brand, agent, SDK instance, and optional settings).
Parameters
| Name | Type | Required | Description |
|---|---|---|---|
| apiUrl | string | Yes | Regal API base URL (https://api.regal.ai). |
| brandSlug | string | Yes | Your brand slug. |
| agentId | string | Yes | AI Agent UUID. |
| sdkInstanceId | string | Yes | SDK instance ID from Regal. |
| widgetHeaderText | string | Yes | Widget header text. |
| pageVisibility | object | No | URL whitelist/blacklist (see "Control where the widget appears"). |
| headless | boolean | No | Hide Regal UI; use with "Start voice / Stop voice" for custom layouts. |
| onEvent | function | No | Callback for widget events (see "Events"). |
window.RegalWidget.init({
  apiUrl: '<https://api.regal.ai'>,
  brandSlug: '...your brand slug...',
  agentId: '...the UUID of your agent...',
  widgetHeaderText: '...your desired widget header..',
  sdkInstanceId: '...the SDK instance ID...',
});
Update contact phone and email
RegalWidget.updateContactPhone(phone)
RegalWidget.updateContactEmail(email)
If you know the user's phone number or email, set it at any point after the widget is initialized and before the contact sends their first message. Passing contact identifiers allows Regal to associate the interaction with the existing contact profile and enables the AI agent to reference and update customer information, allowing for more personalized interactions.
window.RegalWidget.updateContactPhone("+19175550000");
window.RegalWidget.updateContactEmail("[email protected]");
Update agent
RegalWidget.updateAgentId(agentId)
If you want to change which AI agent handles the conversation between interactions, update the agent ID dynamically:
window.RegalWidget.updateAgentId('...agent UUID...');This is commonly used when routing different pages or user states to different agents.
Start / Stop Voice Programmatically
RegalWidget.voice.startInteraction()
RegalWidget.voice.stopInteraction()
Use the voice API to mirror the in-widget voice controls (for example, voice.startInteraction() = user clicking the "Enable Voice" button in the UI).
window.RegalWidget.voice.startInteraction();
window.RegalWidget.voice.stopInteraction();
How to use:
- Be sure to call init first so the widget is mounted. If you call before the widget is ready, you may see an error.
voice.startInteraction()starts voice the same way as clicking to "Enable Voice" in the widget. When you start voice from code (instead of the widget button), your onEvent handler will seesession.initiatedwith initiator system and channels.voice.stopInteraction()ends the voice session, stopping the customer’s microphone from being sent to the agent.
Control where the widget appears
pageVisibility on RegalWidget.init(config)
You can control visibility with whitelist (only matching URLs) or blacklist (everywhere except matches). If both are set, whitelist wins.
This visibility is controlled by the ruleset set by pageVisibility in your RegalWidget.init() config. Each rule is either:
type: "url"— exact URL match (e.g. "https://www.example.com/support").
type: "pattern"— regex pattern tested against the current page URL (e.g. match any URL containing /about/blog).
Only show on select pages (whitelist)
To show the widget only on specific URLs or URL patterns:
window.RegalWidget.init({
  apiUrl: 'https://api.regal.ai',
  brandSlug: '...your brand slug...',
  agentId: '...the UUID of your agent...',
  widgetHeaderText: '...your desired widget header (Chat with Regal)...',
  sdkInstanceId: '...the SDK instance ID...',
  pageVisibility: {
    whitelist: [
      { type: "url", value: "https://www.example.com/support" }, // Show on this full URL
      { type: "url", value: "https://www.example.com/contact" }, // Show on this full URL
      { type: "pattern", value: "/help" },           // Show on any URL containing "/help"
      { type: "pattern", value: "/product/.*" },   // Show on any URL under /product/
    ],
  },
});
Show on all but this page (blacklist)
To show the widget everywhere across your website except on certain pages:
window.RegalWidget.init({
  apiUrl: 'https://api.regal.ai',
  brandSlug: 'your-brand',
  agentId: 'your-agent-uuid',
  widgetHeaderText: 'Chat with us',
  sdkInstanceId: 'your-sdk-instance-id',
  pageVisibility: {
    blacklist: [
      { type: "url", value: "https://www.example.com/checkout" }, // Hide on this full URL
      { type: "pattern", value: "/checkout" }, // Hide on any URL containing /checkout
      { type: "pattern", value: "/account/login" }, // Hide on any path under /account/login
    ],
  },
});
Show or hide the widget programmatically
RegalWidget.setVisible(visible)
If you'd like to show or hide the widget based on something other than the page itself (e.g. a button click, user state, or feature flags), you can call:
window.RegalWidget.setVisible(true)— show the widgetwindow.RegalWidget.setVisible(false)— hide the widget
Note: Calling setVisible overrides the whitelist/blacklist for the rest of the page session until the page is reloaded.
Events
Subscribe to product events by passing onEvent into init. Your callback receives an object with at least name, status, timestamp, and context; many events also include additional data.
window.RegalWidget.init({
  apiUrl: 'apiUrl: 'https://api.regal.ai',
  brandSlug: '...',
  agentId: '...',
  widgetHeaderText: '...',
  sdkInstanceId: '...',
  onEvent: function (event) {
    console.log(event.name, event.status, event.timestamp, event.data, event.context);
  },
});
The table below lists events that are useful for integrating and customizing your Chat/WebRTC experience (analytics, custom UI, error handling).
| Event Name | Description | event.data fields |
|---|---|---|
| widget.loaded | The widget has finished loading in the page. | None |
| widget.opened | The user opened the widget (expanded UI). | None |
| widget.closed | The user closed or minimized the widget. | None |
| session.initiated | The session is initiating for chat and/or voice. Fully ready when session.agent_ready fires. |
|
| session.agent_ready | The agent is ready to respond. | None |
| session.message_sent | A message was sent by the user (via chat or completed speech). |
|
| session.message_received | A message was received from the agent (via chat or completed speech). |
|
| session.voice_started | Voice is active - the customer’s microphone is live for the agent. | None |
| session.voice_stopped | Voice has ended - the agent is no longer receiving the customer’s mic audio. | None |
| session.stopped | The session has ended. |
|
| voice.devices_changed | The browser’s audio input or output device changed. | None |
| voice.devices_error | A device or permission error (for example, microphone denied). | None |
| session.reconnecting | Short connectivity blip - the widget is reconnecting. | None |
| session.reconnected | Connectivity restored after a reconnect. | None |