Authenticate Contact
Overview
The Authenticate Contact action allows your AI Agent to confirm a caller’s identity by comparing information they provide against a known contact attribute. This validation step helps protect sensitive workflows, qualify conversations, and ensure the Agent is interacting with the correct person—without creating friction or awkward pauses.The action supports multiple comparison types and automatically handles normalization, similarity scoring, and matching logic behind the scenes. Based on the comparison, the action returns a clear result that your AI Agent can use to proceed, retry, or escalate according to your flow.
Key Use Cases
| Use Case | What It Enables |
|---|---|
| Last Name Verification | Confirm identity before discussing account details |
| Email Authentication | Verify ownership before sending follow-ups or links |
| Phone Number Confirmation | Ensure the caller matches the contact on file |
| ZIP / ID Checks | Add an extra layer of verification for sensitive actions |
How Authentication Works
When the Authenticate Contact action runs:
- The AI Agent prompts the caller for a value (for example, their email or last name).
- The action compares the caller’s response against a selected contact attribute.
- The system evaluates similarity using built-in phonetic and string matching.
- The action returns one of four results:
- exact_match
- strong_match
- weak_match
- no_match
In most workflows, exact_match and strong_match are treated as successful authentication.
Setting Up the Authenticate Contact Action
The new Authenticate Contact UI removes the need for manual configuration and exposes only the inputs required to define what you’re verifying and how strictly it should be compared.
Configuring Authenticate Contact
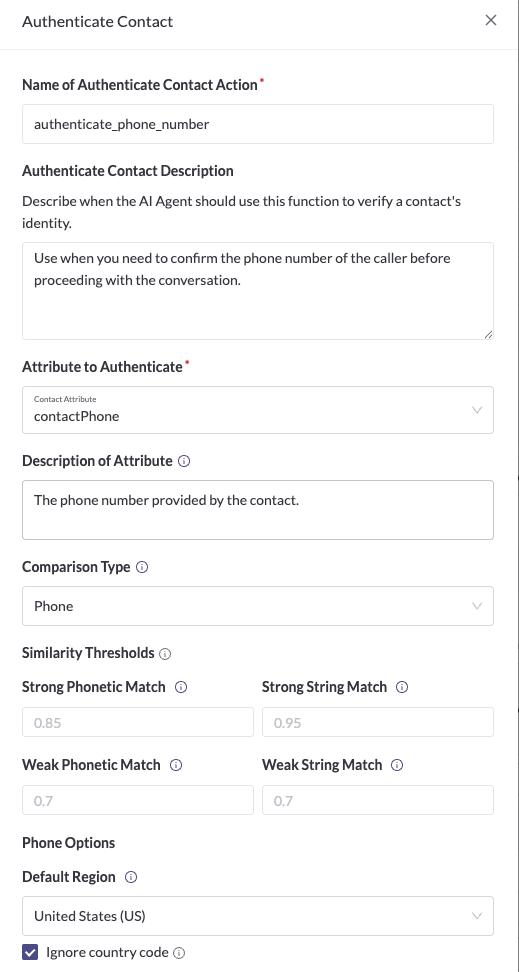
Step 1: Name and Describe the Action
- Name: Give the action a clear, descriptive name (for example,
authenticate_emailorauthenticate_last_name). - Description: Describe when the AI Agent should use this action.
Step 2: Choose the Attribute to Authenticate
Select the contact attribute you want to verify, such as a last name, email address, or phone number. Use the Description of Attribute field to clarify what the Agent should ask for, for example:- “The caller’s email address for verification” or “The last name on the account”.
Step 3: Select a Comparison Type
Choose how the system should evaluate similarity:
- General (Names, SSN, ZIP): Best for names, ZIP codes, and other freeform strings
- Email: Optimized for spoken or typed email addresses
- Phone: Optimized for spoken or formatted phone numbers
Each comparison type automatically applies the appropriate normalization and matching logic.***
Email Comparison Settings
When Email is selected as the comparison type, email-specific handling is applied automatically. Ignore dots in email usernames treats values like [email protected] and [email protected] as the same address.
Spoken emails are normalized so phrases like “dot” and “at” are interpreted correctly before comparison. These settings help ensure minor formatting differences or transcription variations don’t prevent a successful match.***
Phone Comparison Settings
When Phone is selected as the comparison type, phone-specific normalization is applied:- Default region: Determines how spoken phone numbers are interpreted and formatted. This should match the primary country of your callers.
- Ignore country code: Ignores leading country codes (such as
+1), allowing U.S. phone numbers to match whether or not the caller includes them.These options allow callers to speak phone numbers naturally while still matching the contact information on file.***
Step 4: Review Similarity Thresholds (Optional)
Similarity thresholds determine when a response is classified as a strong, weak, or no match. Most teams can rely on the default values and only adjust them if troubleshooting repeated false negatives.***
Step 5: Configure Execution Behavior
- Speak After Execution: Allows the Agent to continue the conversation immediately after authentication completes.
- Speak During Execution: Keeps the caller engaged if the action takes longer than expected.
Using Authentication Results in Your Flow
After the action runs, your AI Agent receives a match result.Typical handling logic:- exact_match / strong_match: Proceed with the workflow
- weak_match: Re-ask or confirm
- no_match: Retry, switch verification methods, or escalateThe Agent should handle this silently and respond naturally—without mentioning match scores, thresholds, or stored values.***
Best Practices- Never reveal the value on file (email, phone number, name, etc.).
- Never explain how close a response was or why it failed.
- Always define a fallback path after repeated failures.
- Start with simpler attributes before escalating to more sensitive checks.
Testing Your Setup
Before going live:
- Place test calls using contacts with known values.
- Verify correct behavior for both matching and non-matching inputs.
- Confirm the Agent proceeds, retries, or escalates as expected.
Summary
The Authenticate Contact action makes it easy to verify callers using information you already have—without complex setup or exposing sensitive details. By handling normalization and similarity logic automatically through a guided UI, this action allows AI Agents to authenticate confidently, securely, and naturally within any voice flow.