Triggered Outbound Calls
Trigger your outbound calls based on customers' specific behaviors by connecting your customer data sources to Regal and building Journeys.
Journeys allow you to design personalized, cross-channel experiences for your customers based on their specific behaviors and attributes.
As a customer's actions change, the set of touch points they receive change as well. You can use journeys to engage customers throughout the customer lifecycle. For example:
- Welcome journeys for new customers
- Purchase funnel abandonment journeys
- Retention journeys for at risk customers
- Up-sell and cross-sell journeys to grow share of wallet
- Winback journeys for lost customers
To send customer data to Regal, you can call our Events API directly or leverage one of our native data integrations.
You can configure as many journeys as you want.
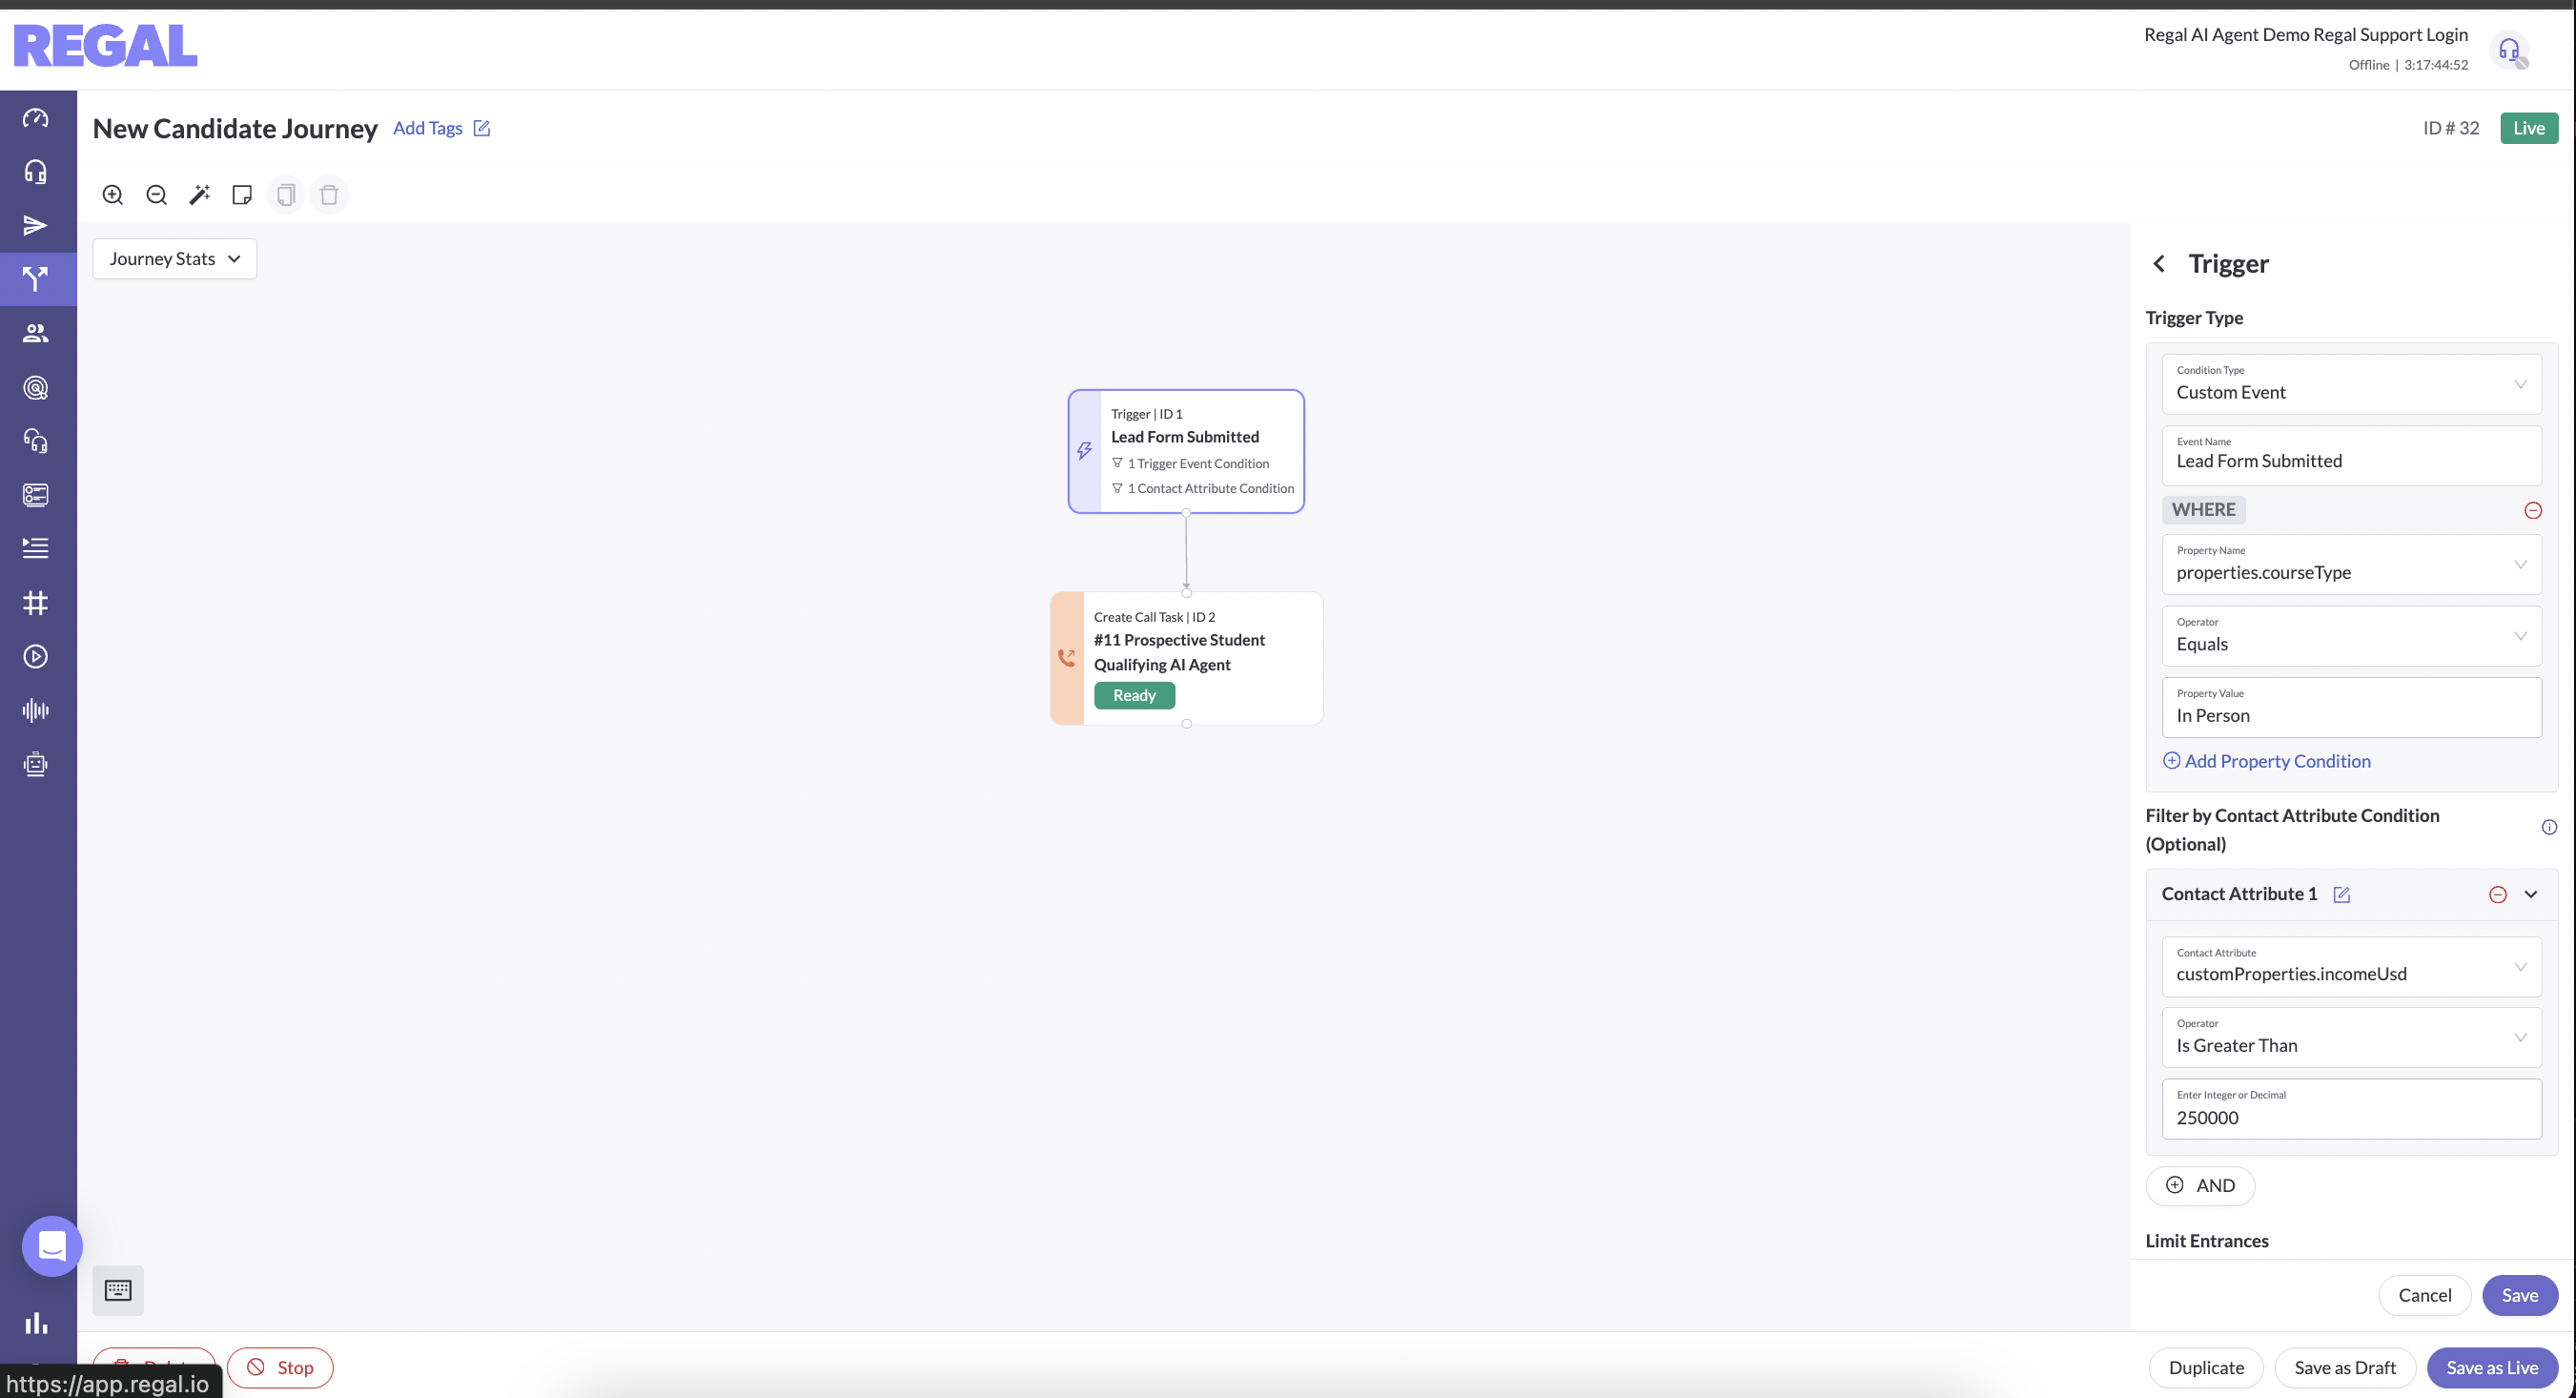
A simple welcome journey for new customers to trigger an outbound call to each new prospect who fills out a form on your site would look like the following.
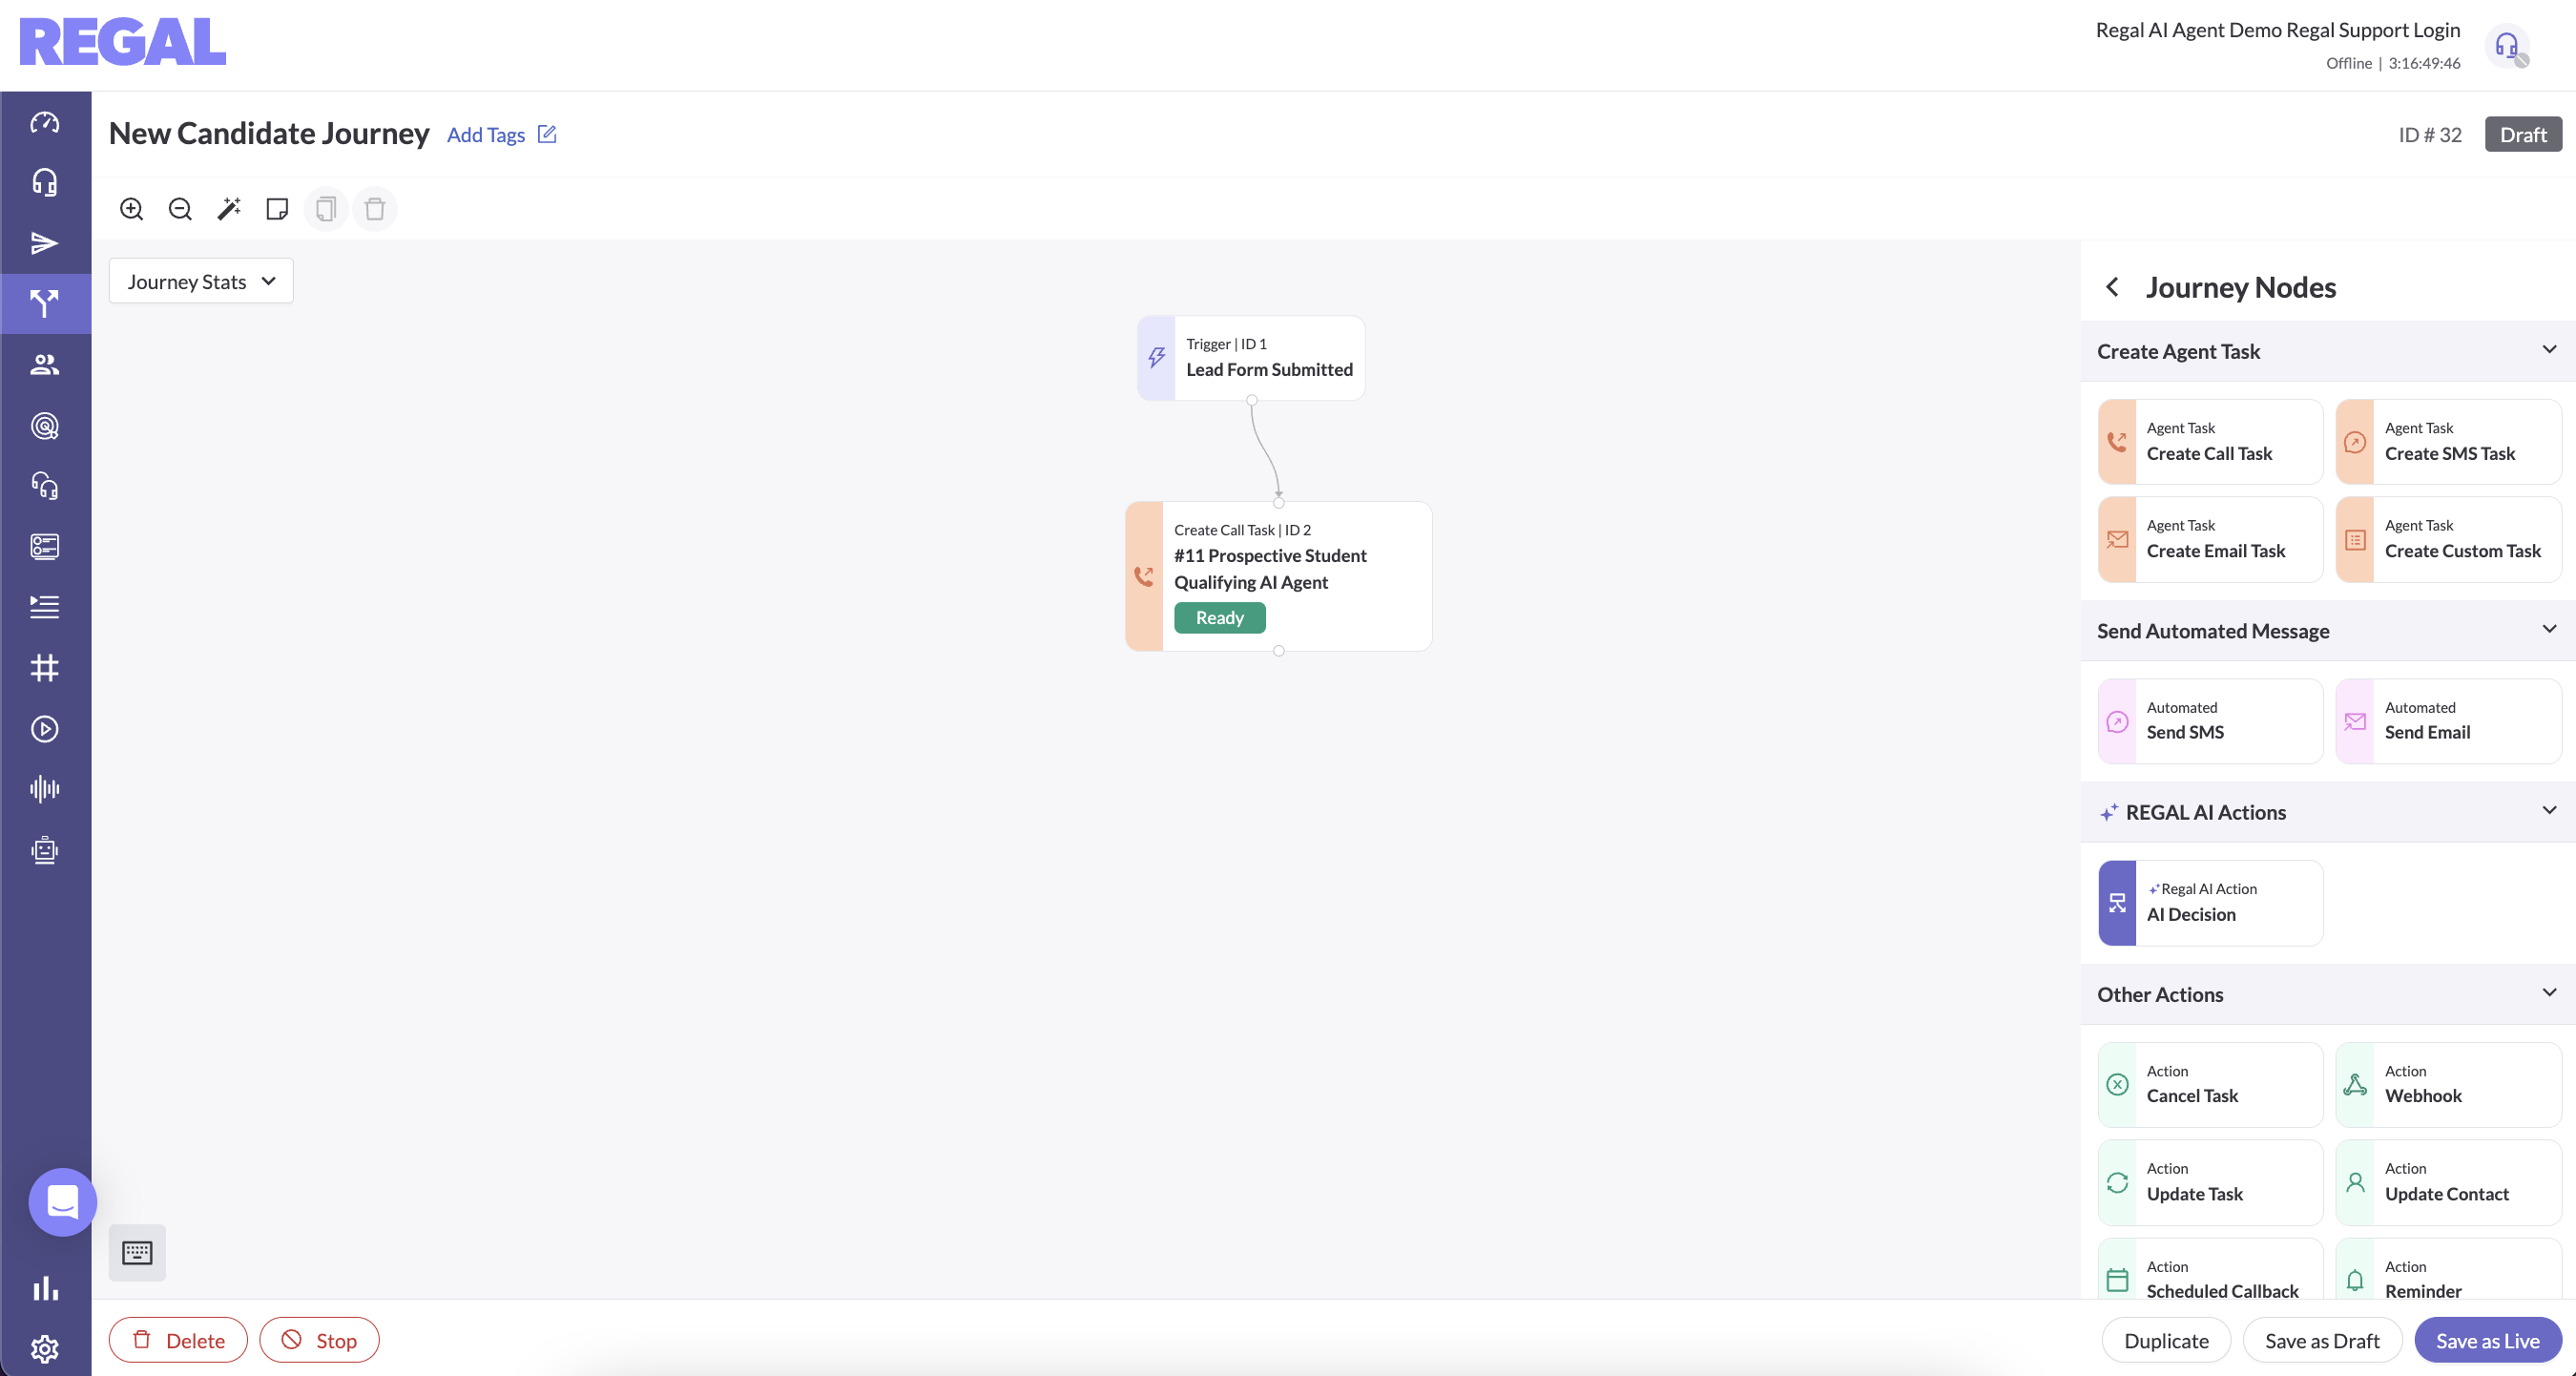
Step 1: Configure Journey
- Navigate to Journeys > New
- Add a trigger node and input the event name that will trigger the journey (in our example we called it "Lead Form Submitted")
- Drag a Create Call Task node and link the Trigger node to it
- Select a campaign in the Create Call Task node (see steps for Campaign configuration below), then save your Journey (as Draft if you're not ready to trigger calls) or as live if you are ready.
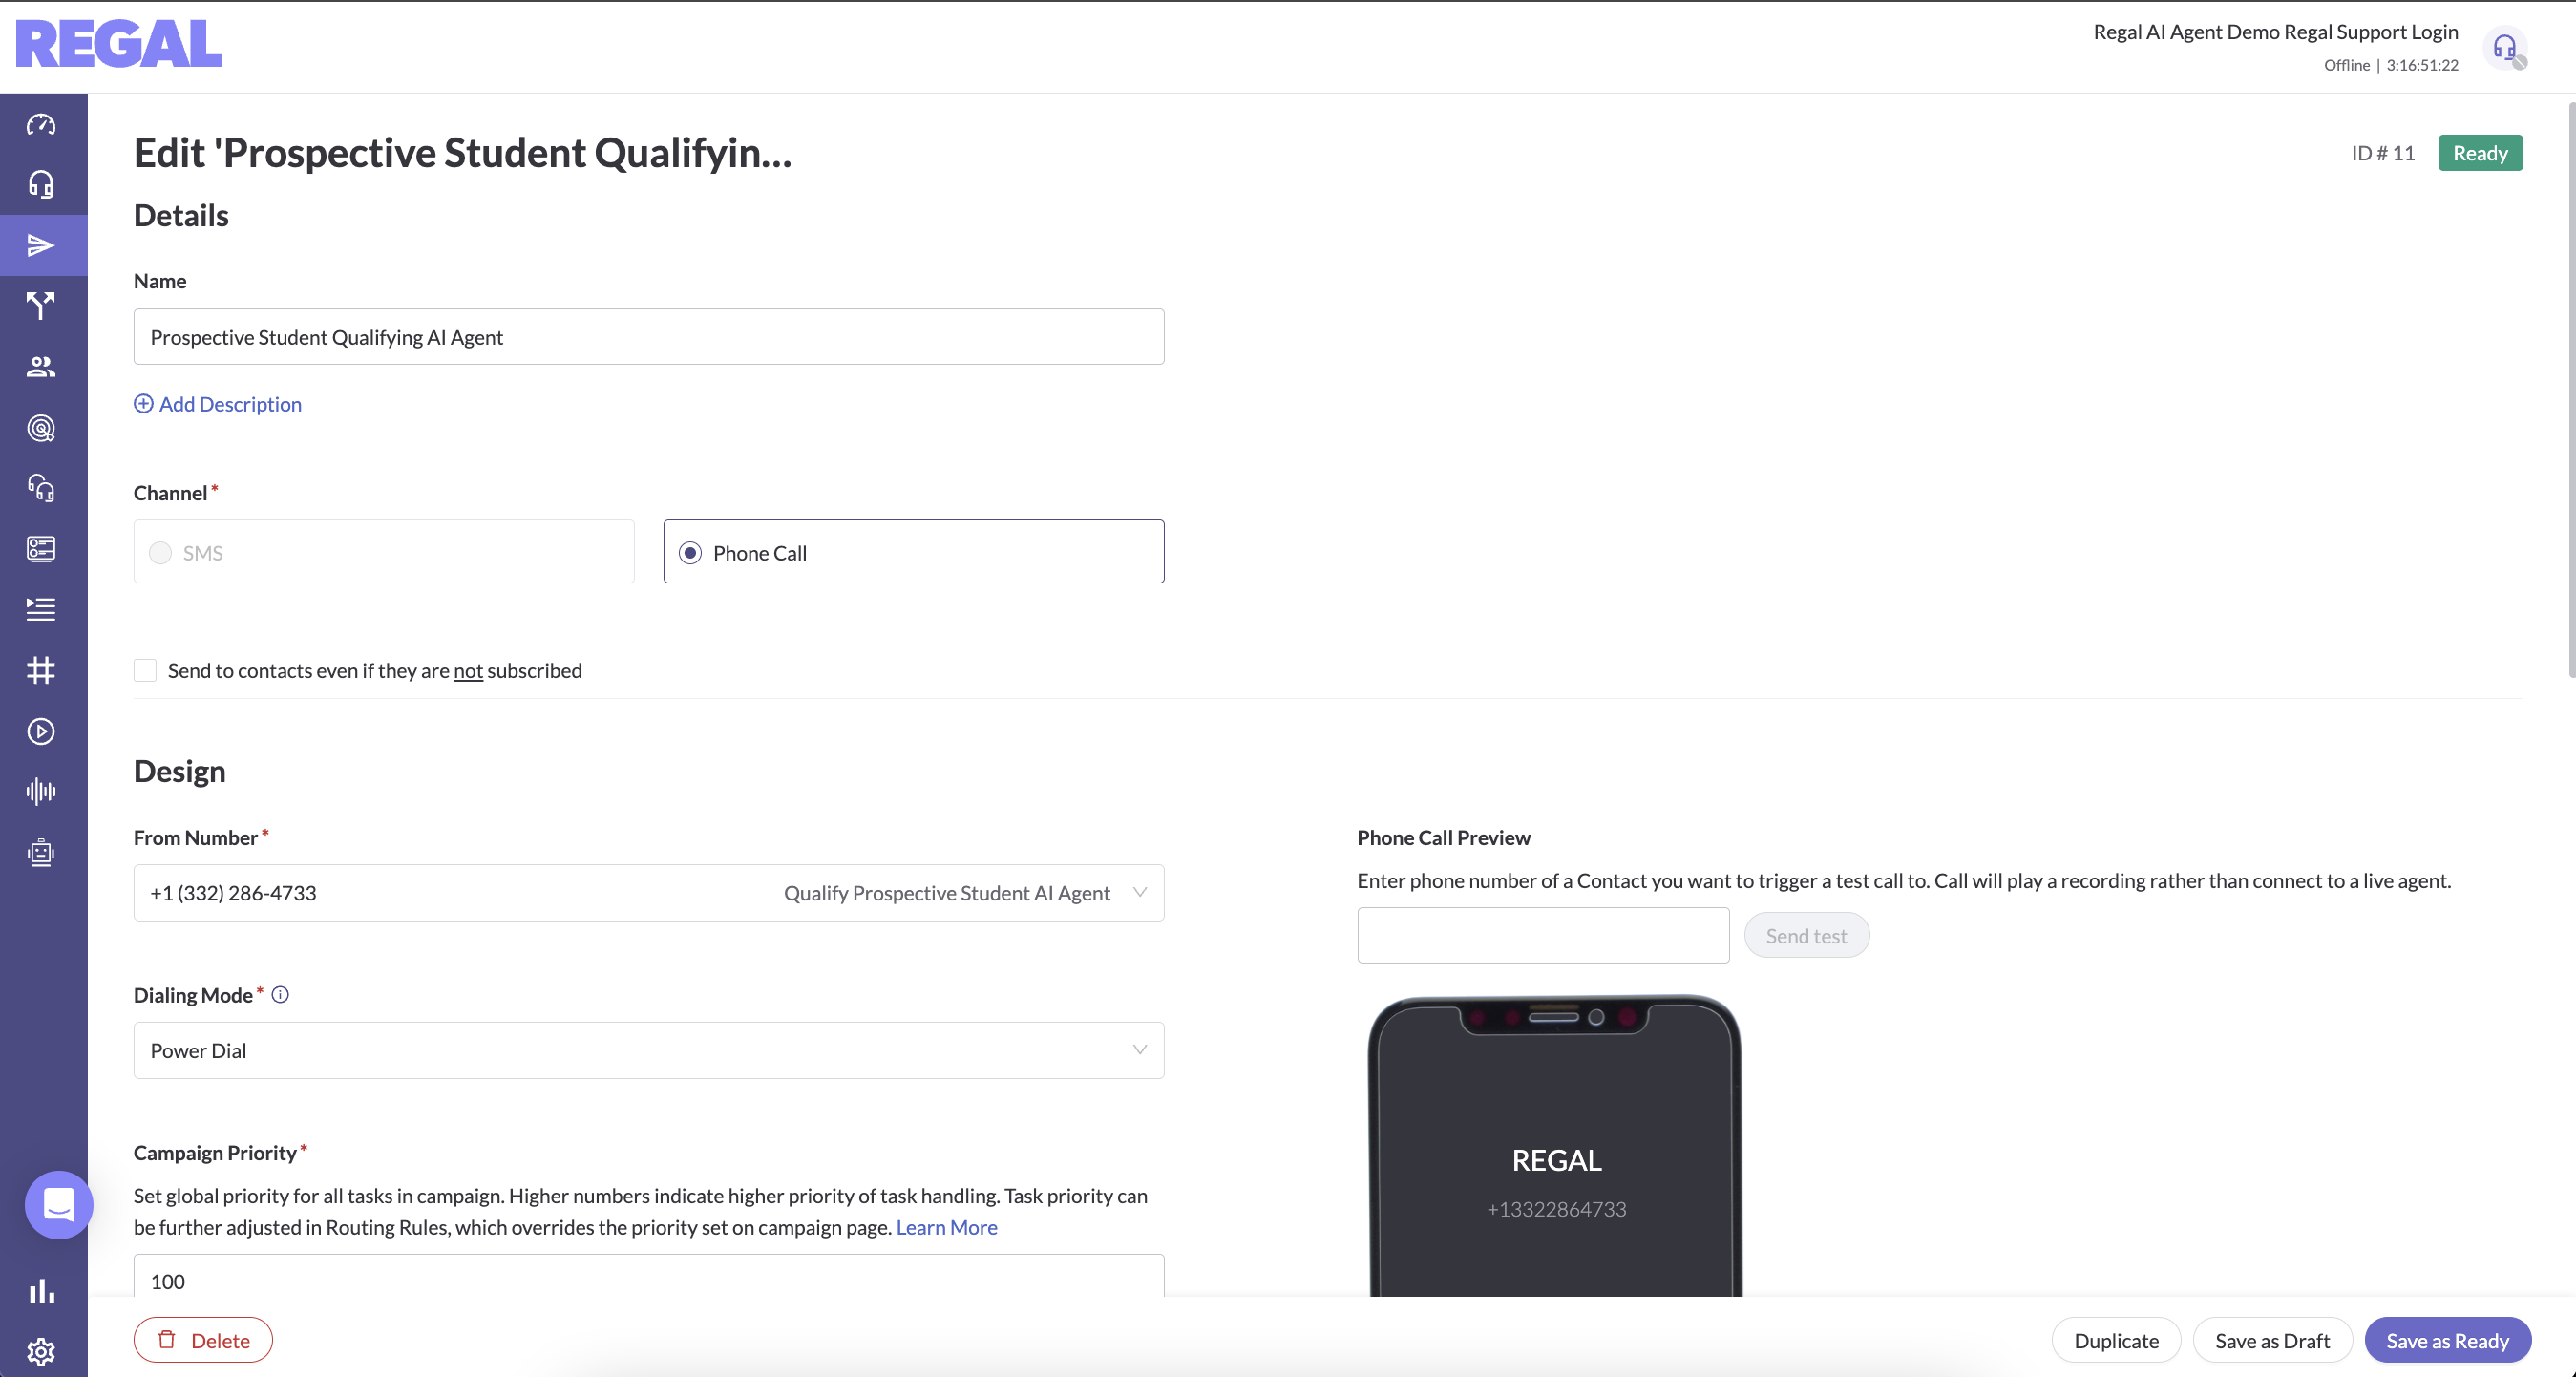
Step 2: Configure Call Campaign
You need to create the Call campaign to select in the Call Task node.
- Navigate to Campaigns > New
- Configure your Campaign with the following inputs:
- Name your campaign
- Select Phone Call as the channel
- Select a phone number to place the call from - this can be a static number or dynamic based on area code or an integration with OutboundANI. Talk to your FDE about setup for these more advanced options.
- Select your dialing mode
- Power or Preview Dial: those are the same when it comes to AI Agents. It means the agent is on the call from the moment it starts to dial including ring time. You can optionally also run AMD while the AI agent is on the call.
- ✅ Pros: Gives AMD more time to determine if it's a voicemail (higher accuracy)
- ❌ Cons: Incurs AI agent consumption on ring time
- Progressive Dial: this means Regal dials the call and waits until the call connects to add the AI agent. Then we run AMD for ~3 seconds to determine if a human answered. If no, we remove the AI agent and either end the call or drop a pre-recorded voicemail (depending on your selected preference). If yes, the AI agent handles the call
- ✅ Pros: Don't incur AI agent consumption on ring time
- ❌ Cons: Only give 3 seconds for AMD to determine voicemail (lower accuracy), can't have AI agent leave a personalized voicemail
Note: Progressive dial campaigns additionally require you to select the target queue for where this task should be routed
- Power or Preview Dial: those are the same when it comes to AI Agents. It means the agent is on the call from the moment it starts to dial including ring time. You can optionally also run AMD while the AI agent is on the call.
- Set the Priority - calls with higher priority routed to the same queue will be prioritized first
- Voicemail options - if you want to leave a pre-recorded voicemail, select that option, else selected no voicemail.
- The rest of the fields are unimportant for AI agent calls, you can just type in placeholders to save the campaign.
Step 3: Send Event to Trigger Your Journey
Use Regal's Events API or our many native customer data integrations to bring customer data into Regal to trigger your journey.
In our example, we'll use the Regal Events API and send in the following payload to trigger our journey:
{
    "userId": "1730139284",
    "traits": {
        "phones": {"+19545582399": {"voiceOptIn": {"subscribed": true}}},
        "firstName": "Jessica",
        "lastName": "Donolly",
        "incomeUsd": 300000,
        "title": "COO",
        "industry": "Financial Services"
    },
    "name": "Lead Form Submitted",
    "properties": {
        "course": "Executive MBA",
        "courseType": "Online"
    }
}
This payload:
- Creates a
Lead Form Submittedevent for a profile with phone identifier: +19545582399 (and an external id which is optional) - Opts in +19545582399 to receive calls, which is important.
OptIn Required To Receive Outbound CallsWhen using Regal to dial outbound calls, we require TCPA optIn in order for a call to be placed to a contact. When testing, if you've forgot to add optIn, you can do so from the Audience page > Search for the contact > Subscribe them to voice. Alternatively, on the Campaign detail page, you can check the box "Send to contact even if they are not subscribed" option. That will bypass the need for optIn. This should only be used in testing or if your calls are not marketing/sales in nature.
- Adds several optional attributes to Jessica's contact profile like name, income, etc.
- Triggers the New Candidate Journey for Jessica (creating/queuing up an outbound call task)
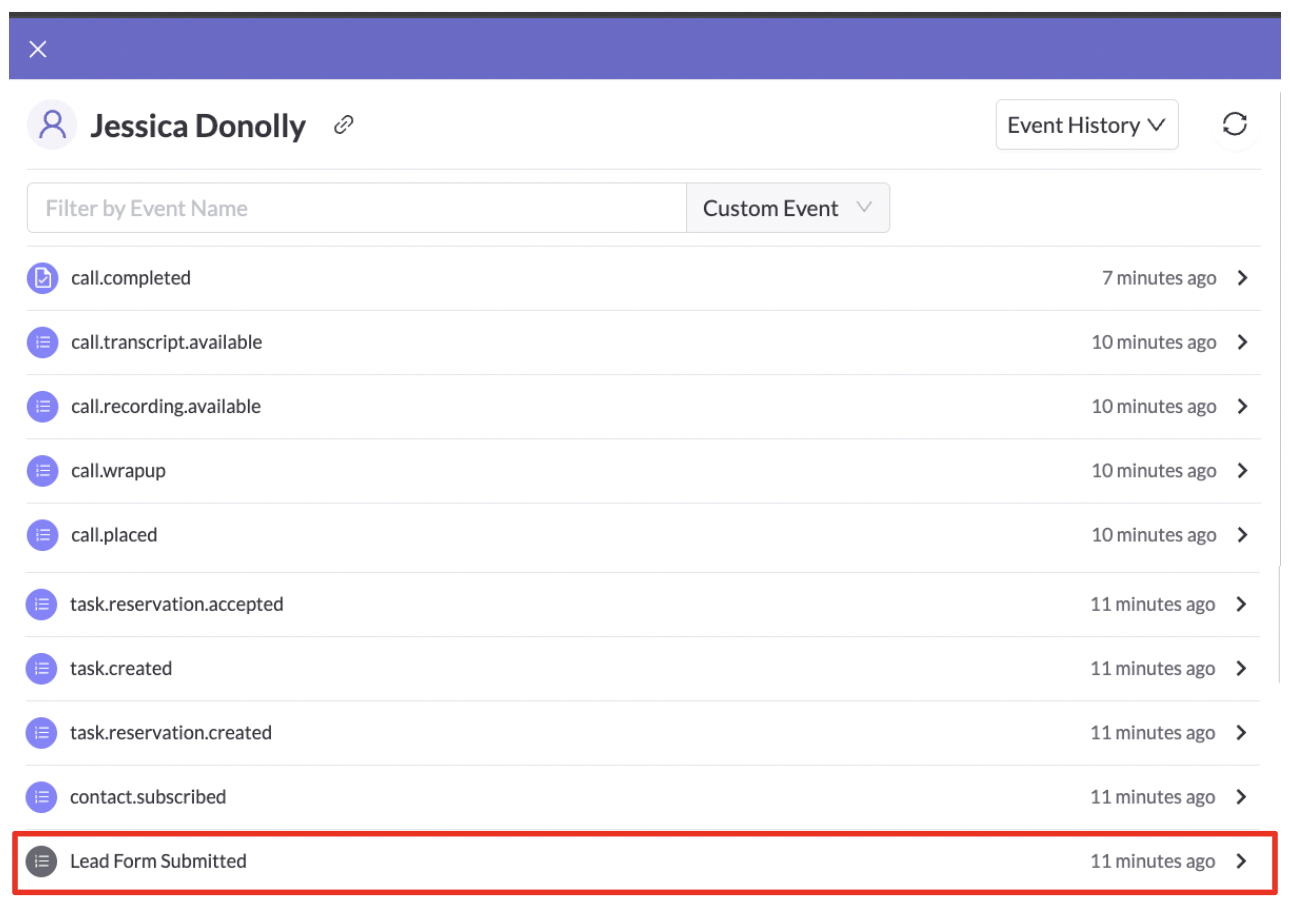
Contact Profile - Event History
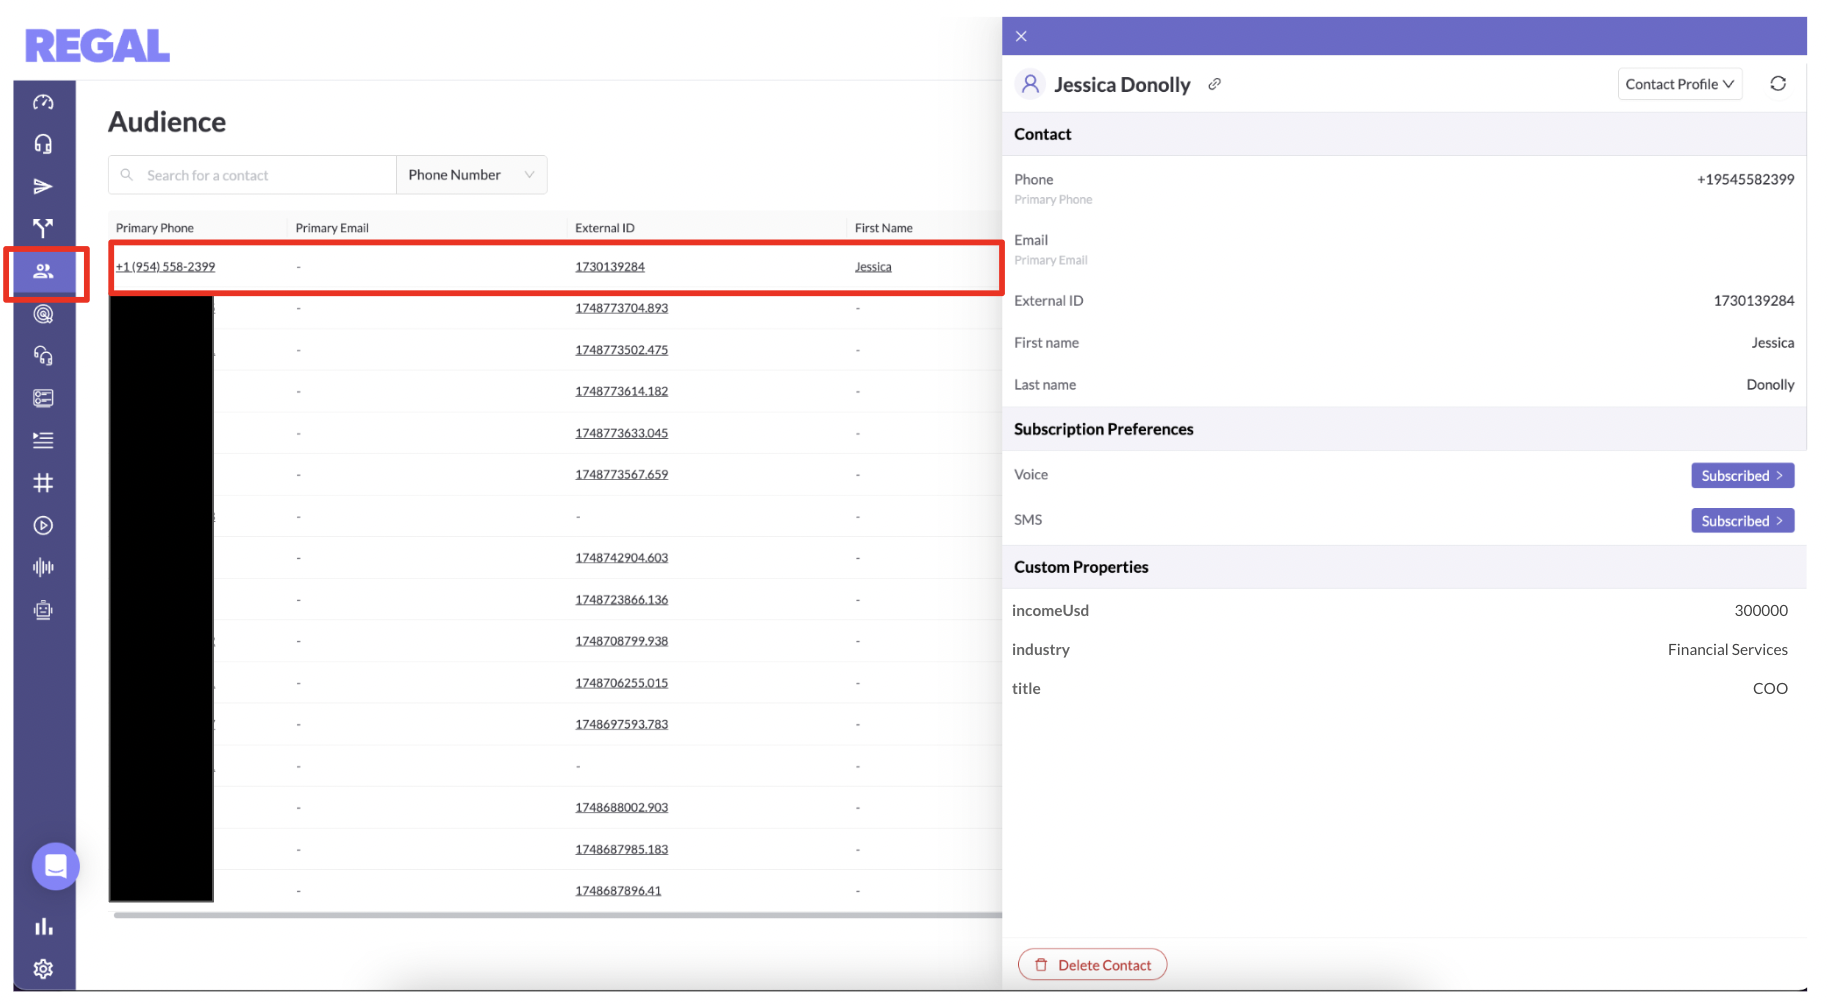
Contact Profile - Attributes
Optional: Journey Conditions and A/B Testing
Those attributes (or the event properties) can be referenced in your Agent Prompt to personalize the conversation and in your journeys to further refine your journey logic. For example, if you wanted to only trigger calls for applicants doing the in person program who already earned above 250,000, you could add those criteria to your trigger node.
Finally, if you wanted to A/B test different types of outbound AI agents, you could add an A/B Test node and create 2 separate call campaigns (one which you'll route to a "male" agent and one to a "female" agent).

Step 4: Routing Call Task to the Right AI Agent
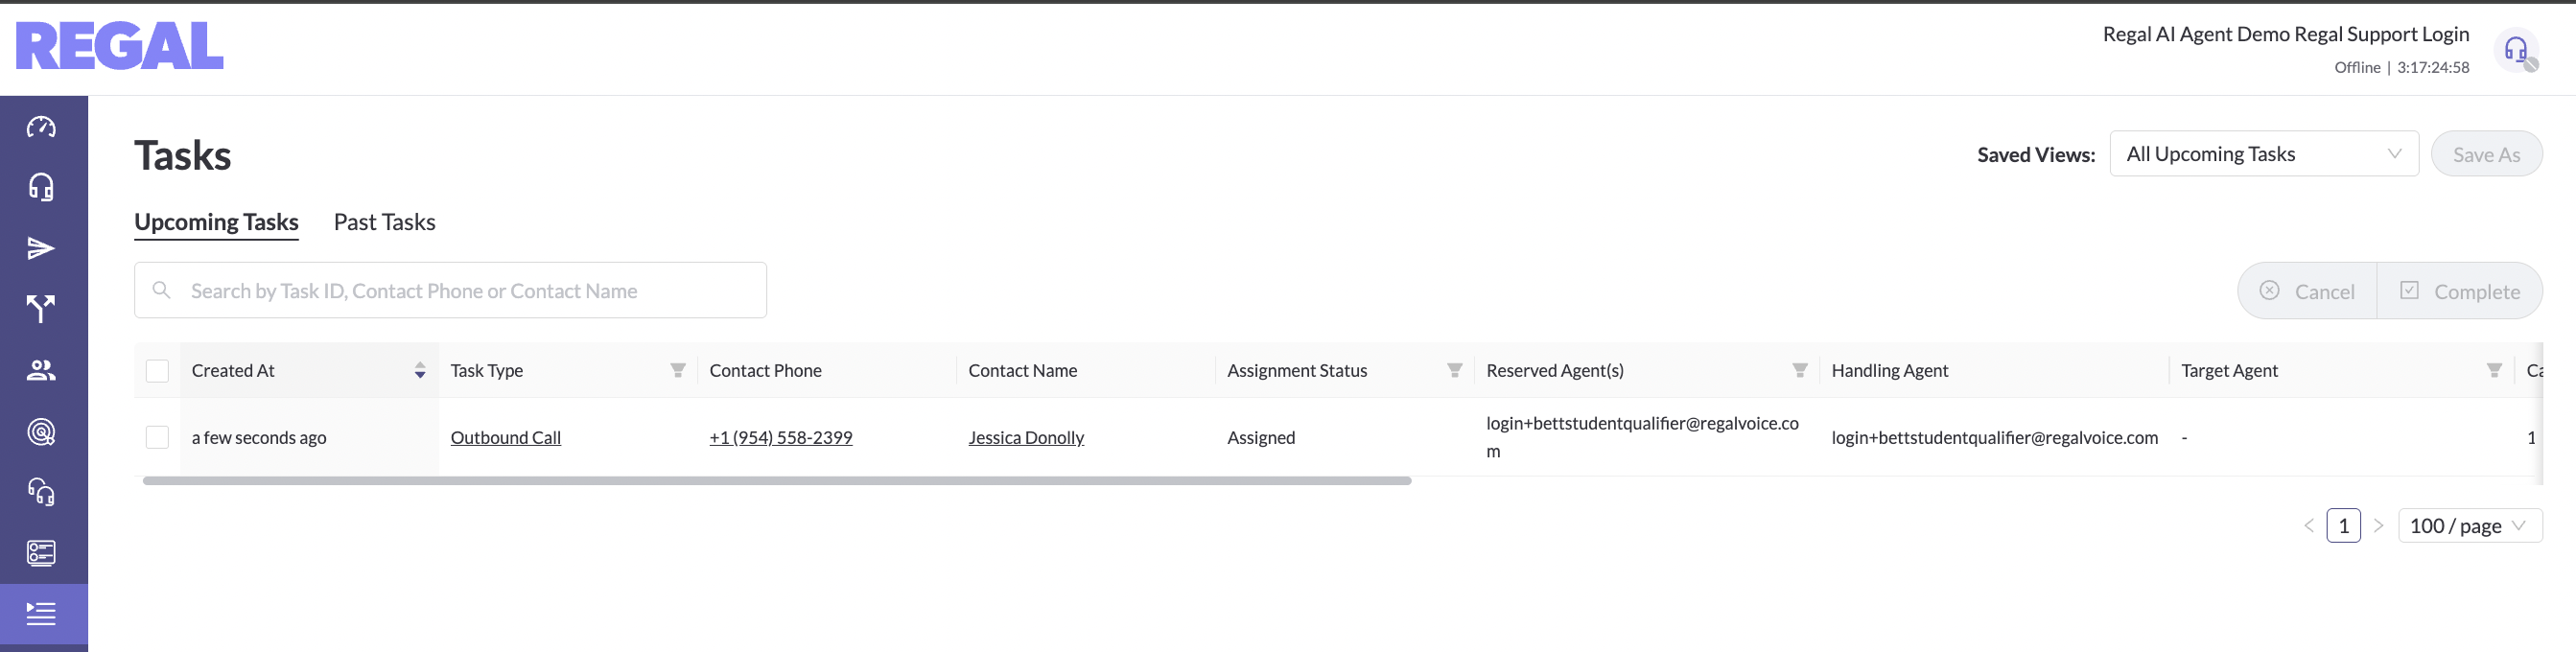
When we triggered our original journey with the example event payload, it created this call task which you can see on the Tasks page:
The final step required to get the call to your agent is to configure an Outbound Call Routing Rule and then turn your outbound voice agent to Available (otherwise your calls will just queue up but not get dialed/handled by your agent). See this Outbound Call Routing guide for instructions.

▶️ VIDEO TUTORIAL
Updated 3 months ago