Freshdesk
Send customer profile and ticket/event data bewteen Freshdesk and Regal
DATA IN
This section describes how to use Freshdesk as a source for sending your customer profile and ticket data to Regal using a Freshdesk Webhooks Actions.
Sending data from Freshdesk to Regal
Regal relies on the Freshdesk Automations & Webhokk actions to send data to Regal. You can refer to Freshdesk documentation for additional information and examples.
Create New Freshdesk Automation
Log in to Freshdesk as an admin. Then, navigate to Automations by selecting Settings > Workflows > Automations.

There are three types of Automation rules you can create. Depending on your use case you will select one, or set up multiple triggers.
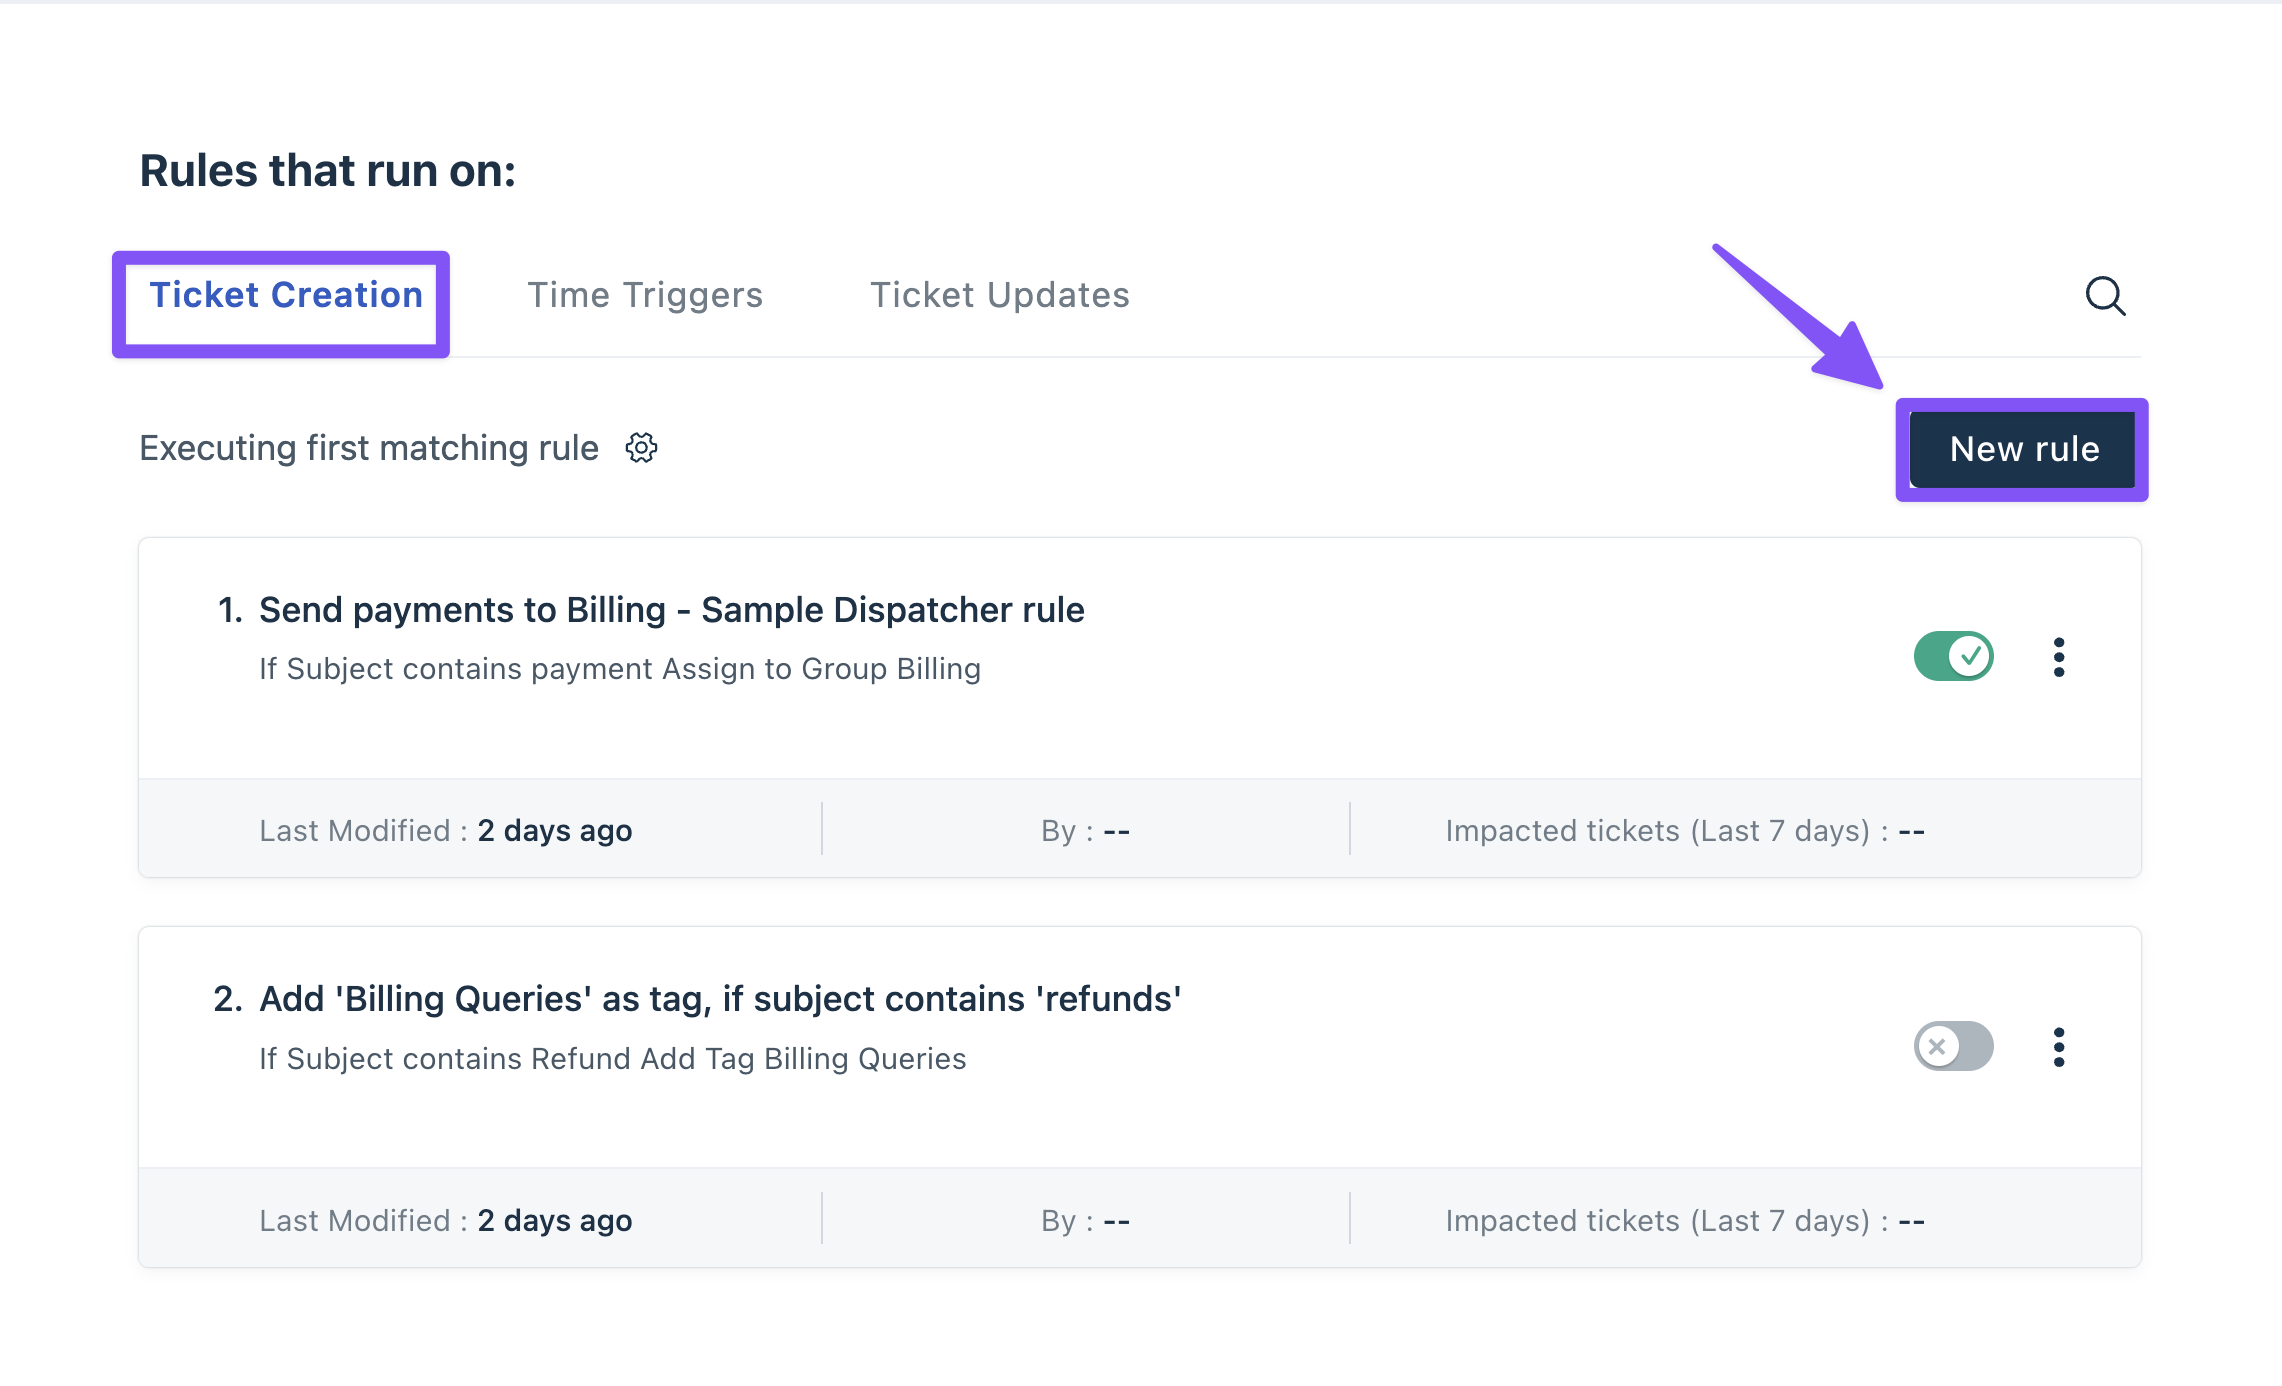
Ticket Creation: Runs on every ticket as soon as it is created
Time Triggers: Scans all the tickets once every hour and checks if a ticket has been under a condition for a specific time period.
Ticket Updates: Checks for events that update a ticket and perform a set of actions based on the condition.
Addition Freshdesk documentation on Automation Rules.
Select the relevant Automation Trigger type.
In this example, we're going to use the Ticket Creation trigger because we want to send a ticket created event in Regal to trigger a journey when a new Refund ticket is created in Freshdesk.
Before you create a new rule under the relevant Trigger type, ensure the "Rule execution type" settings will support multiple automations with the same matching rules.
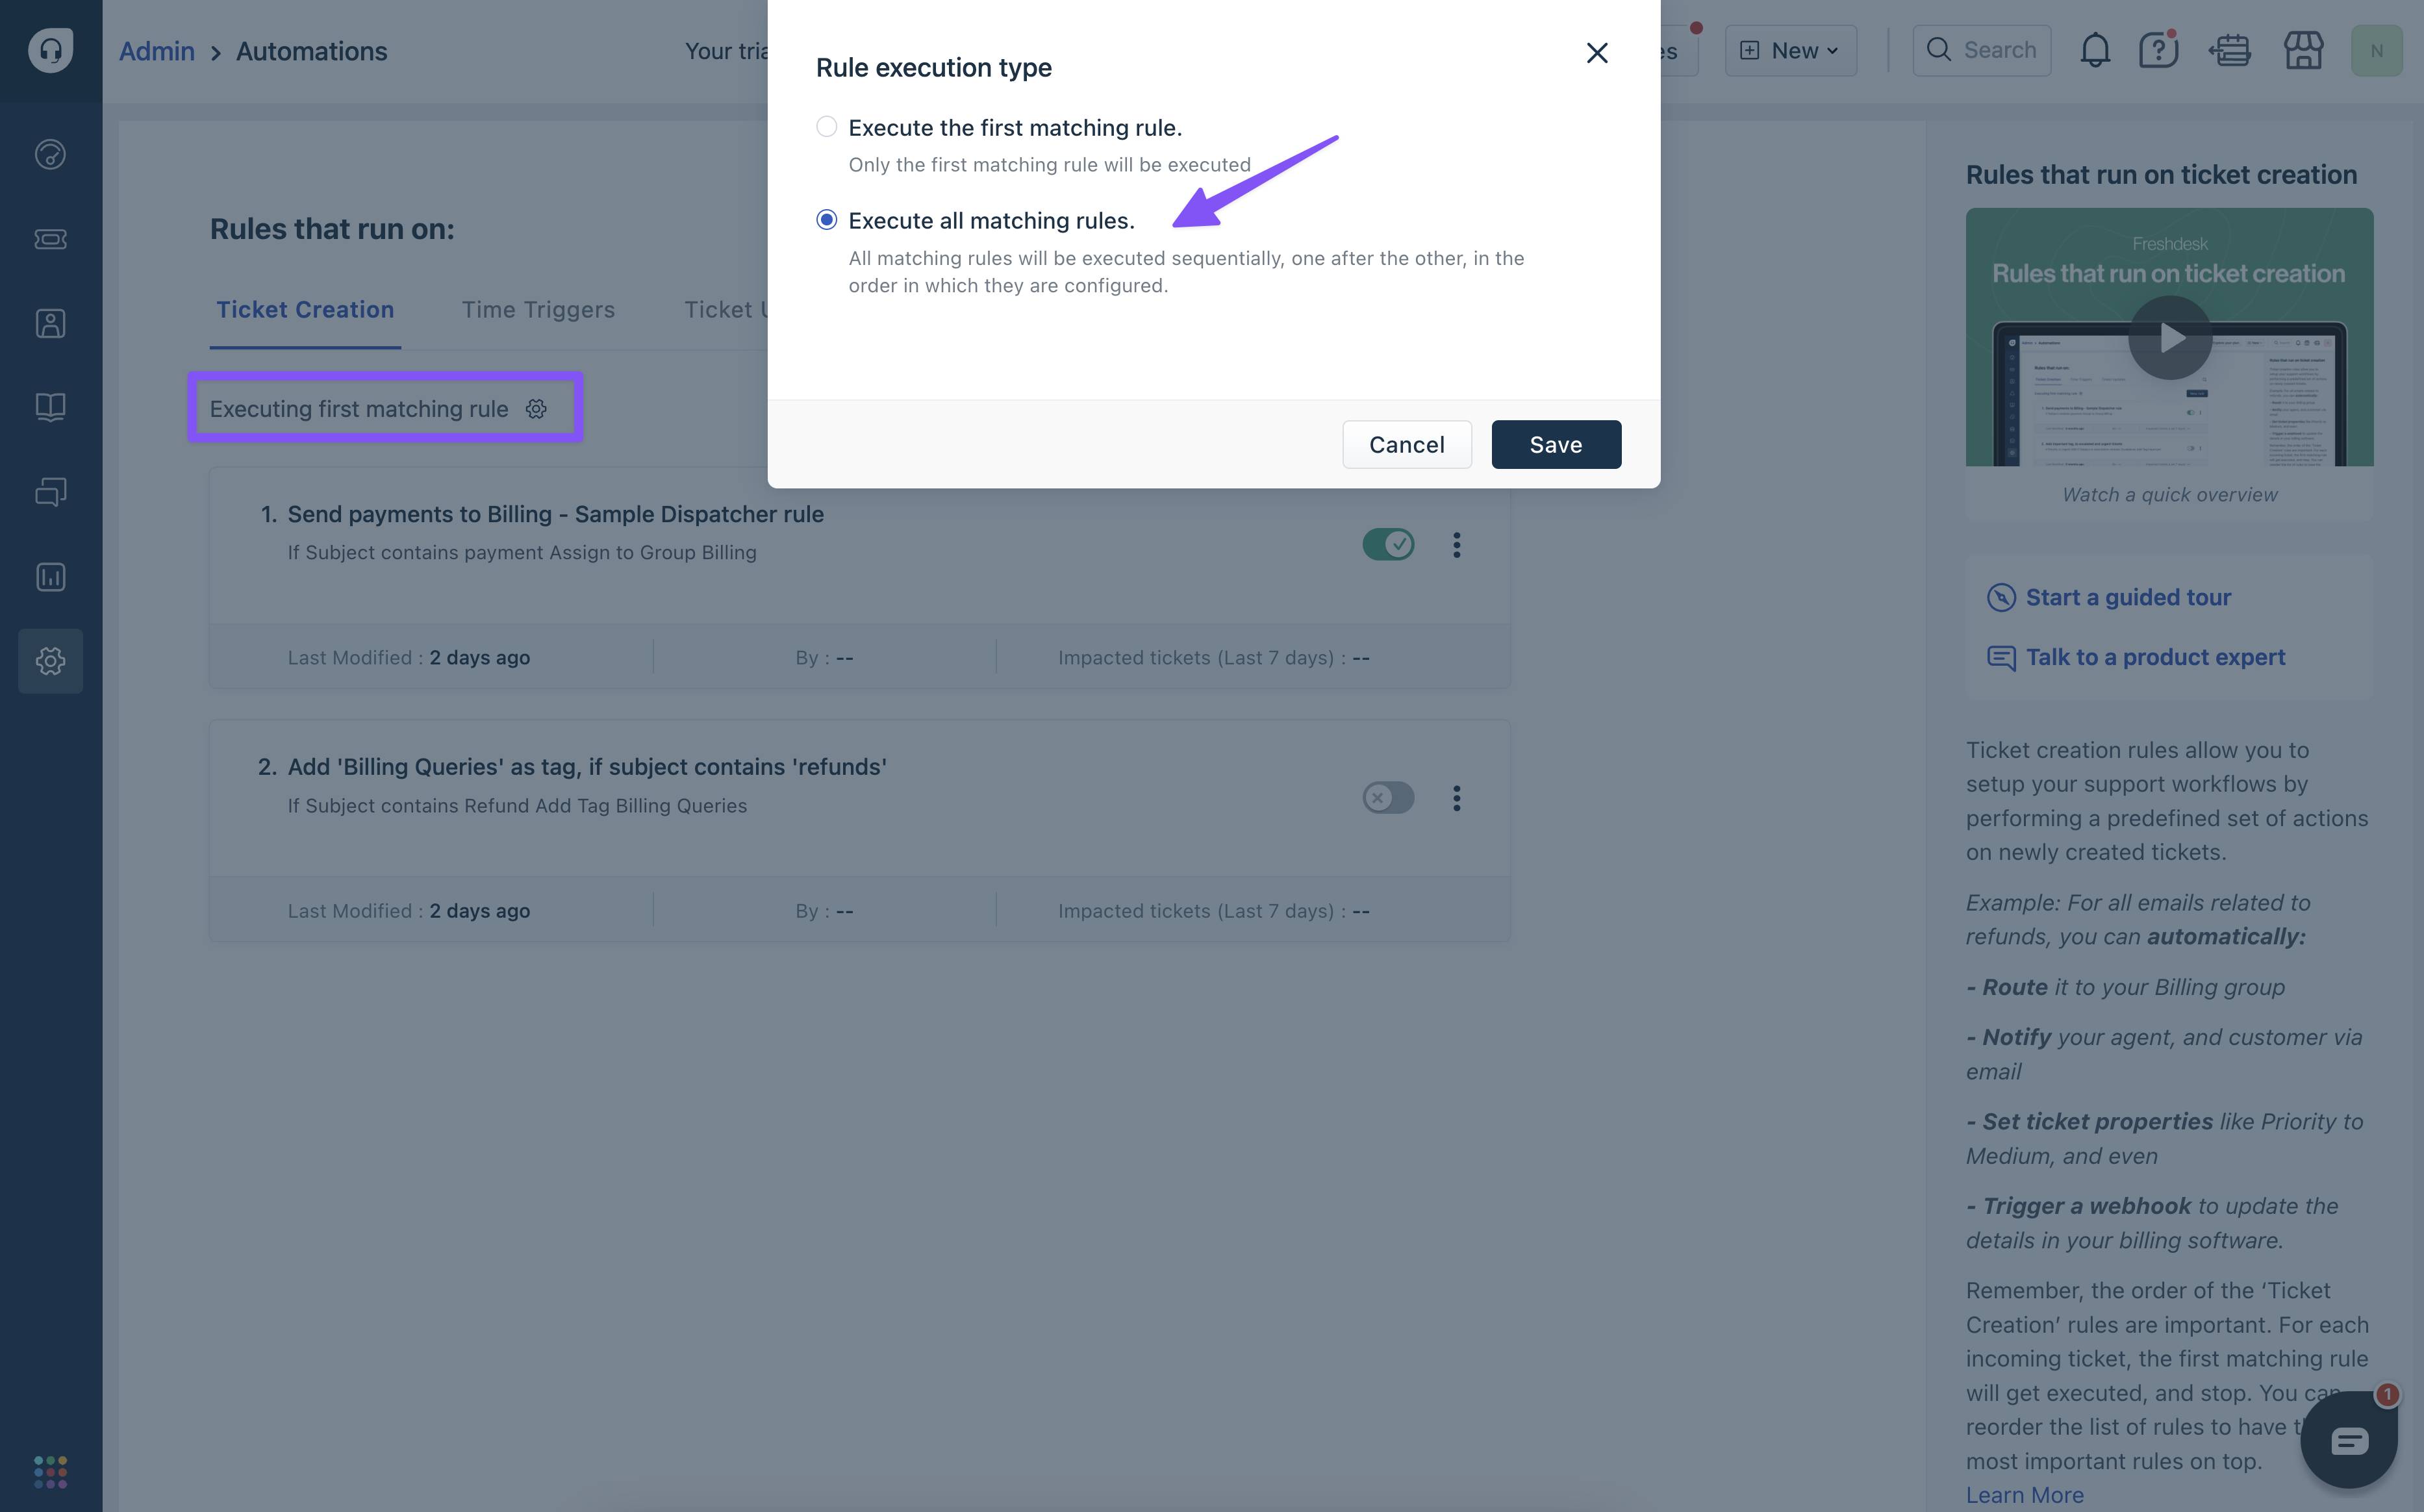
Select "New Rule" within the desired Trigger.
Configure Freshdesk automation filter
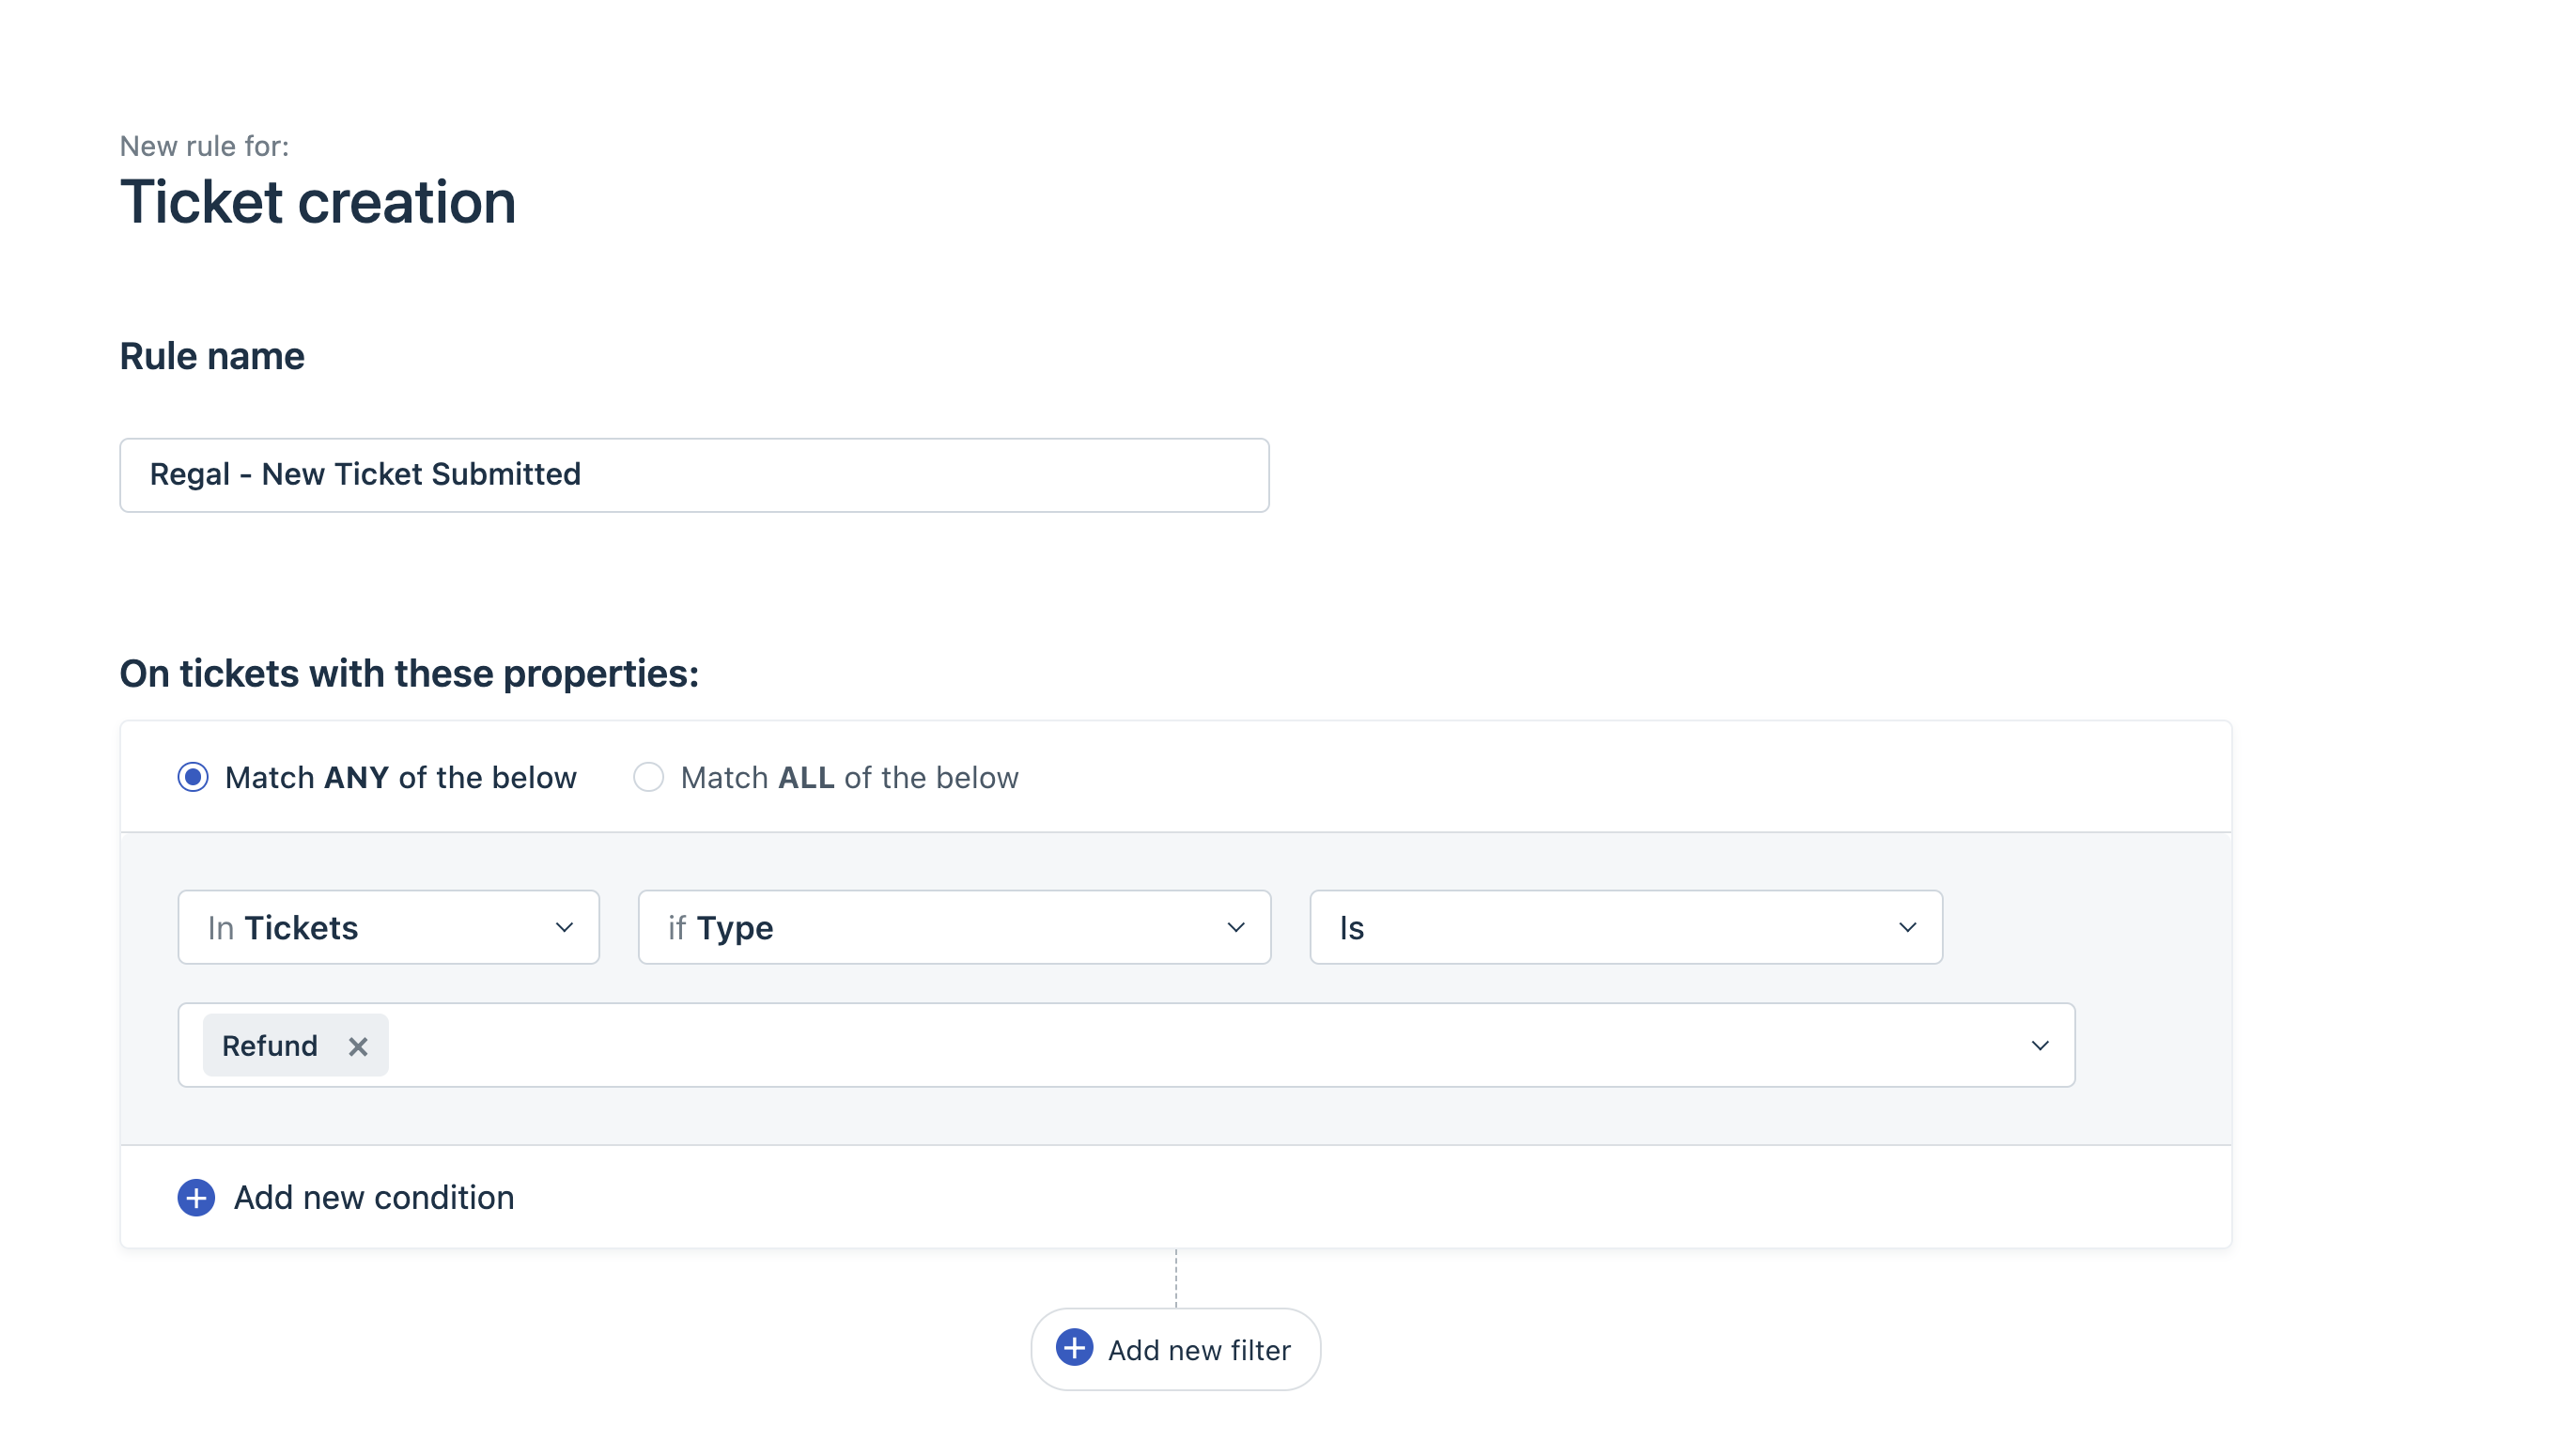
Name your rule (e.g. Regal - New Ticket Submitted)
Add one or multiple conditions (i.e. Filter) to limit the tickets that are eligible to send data to Regal.
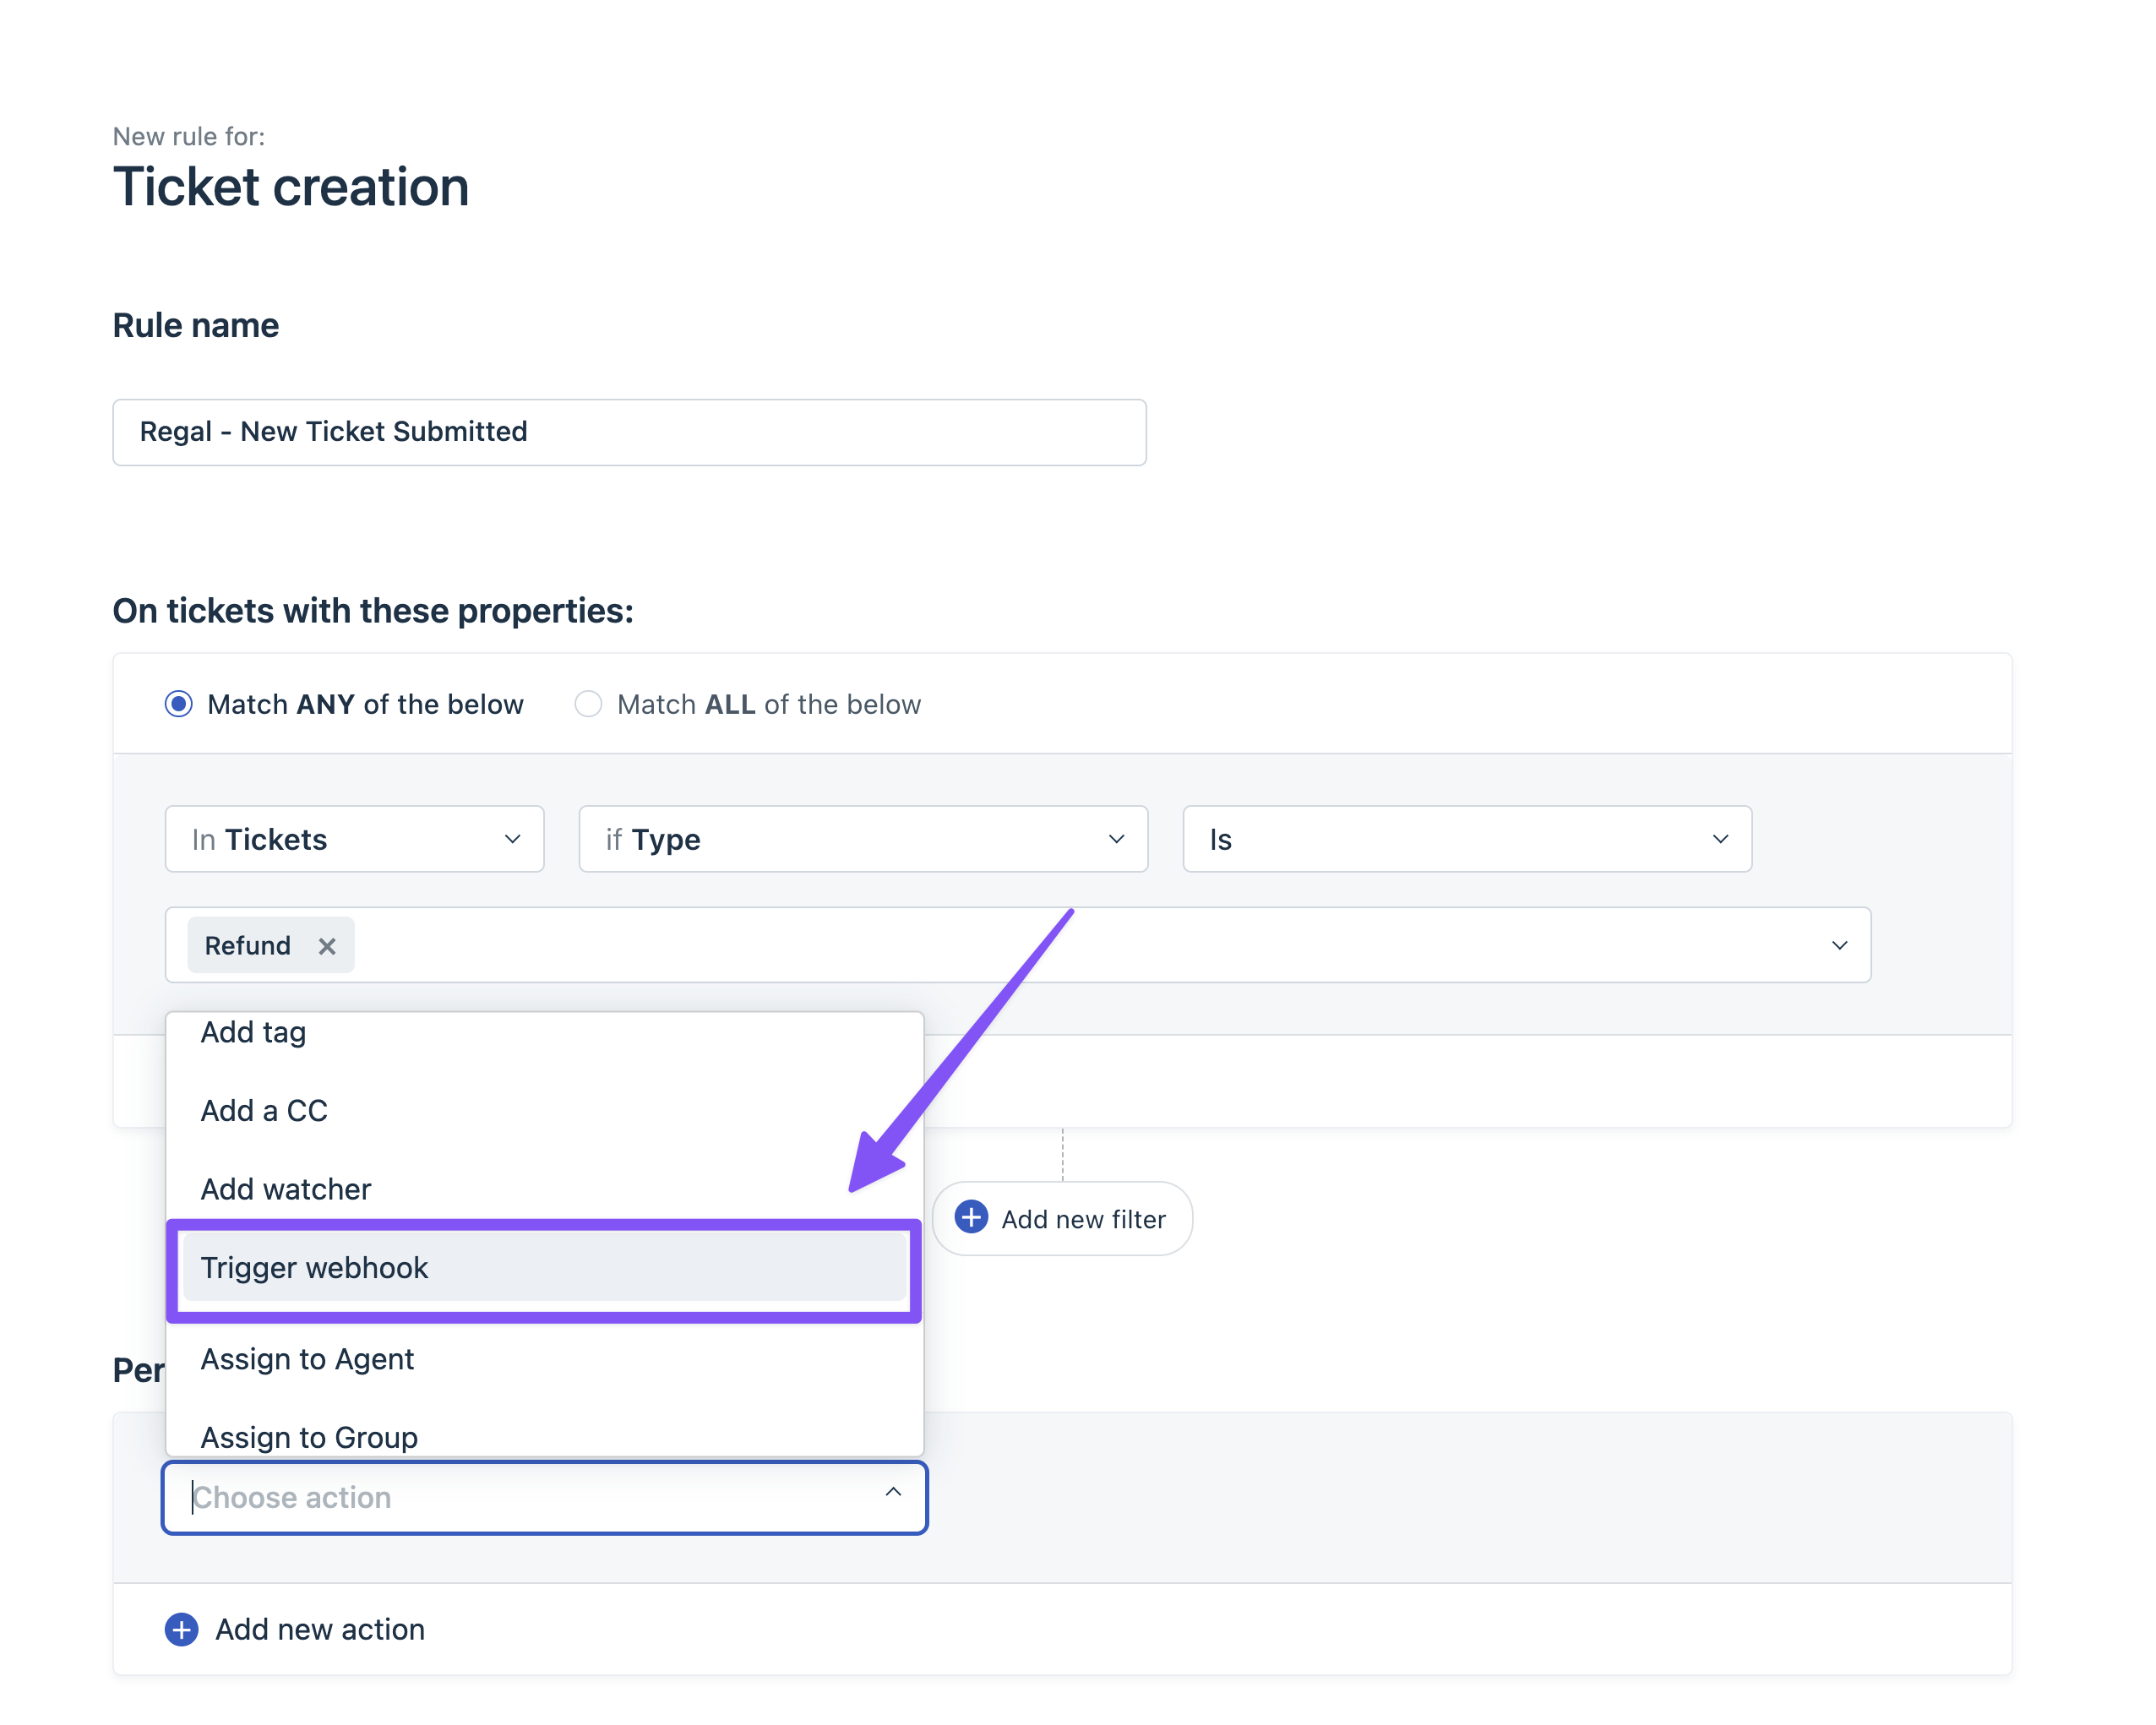
In this example, I will filter only for cases where the Ticket Type field is "Refund."
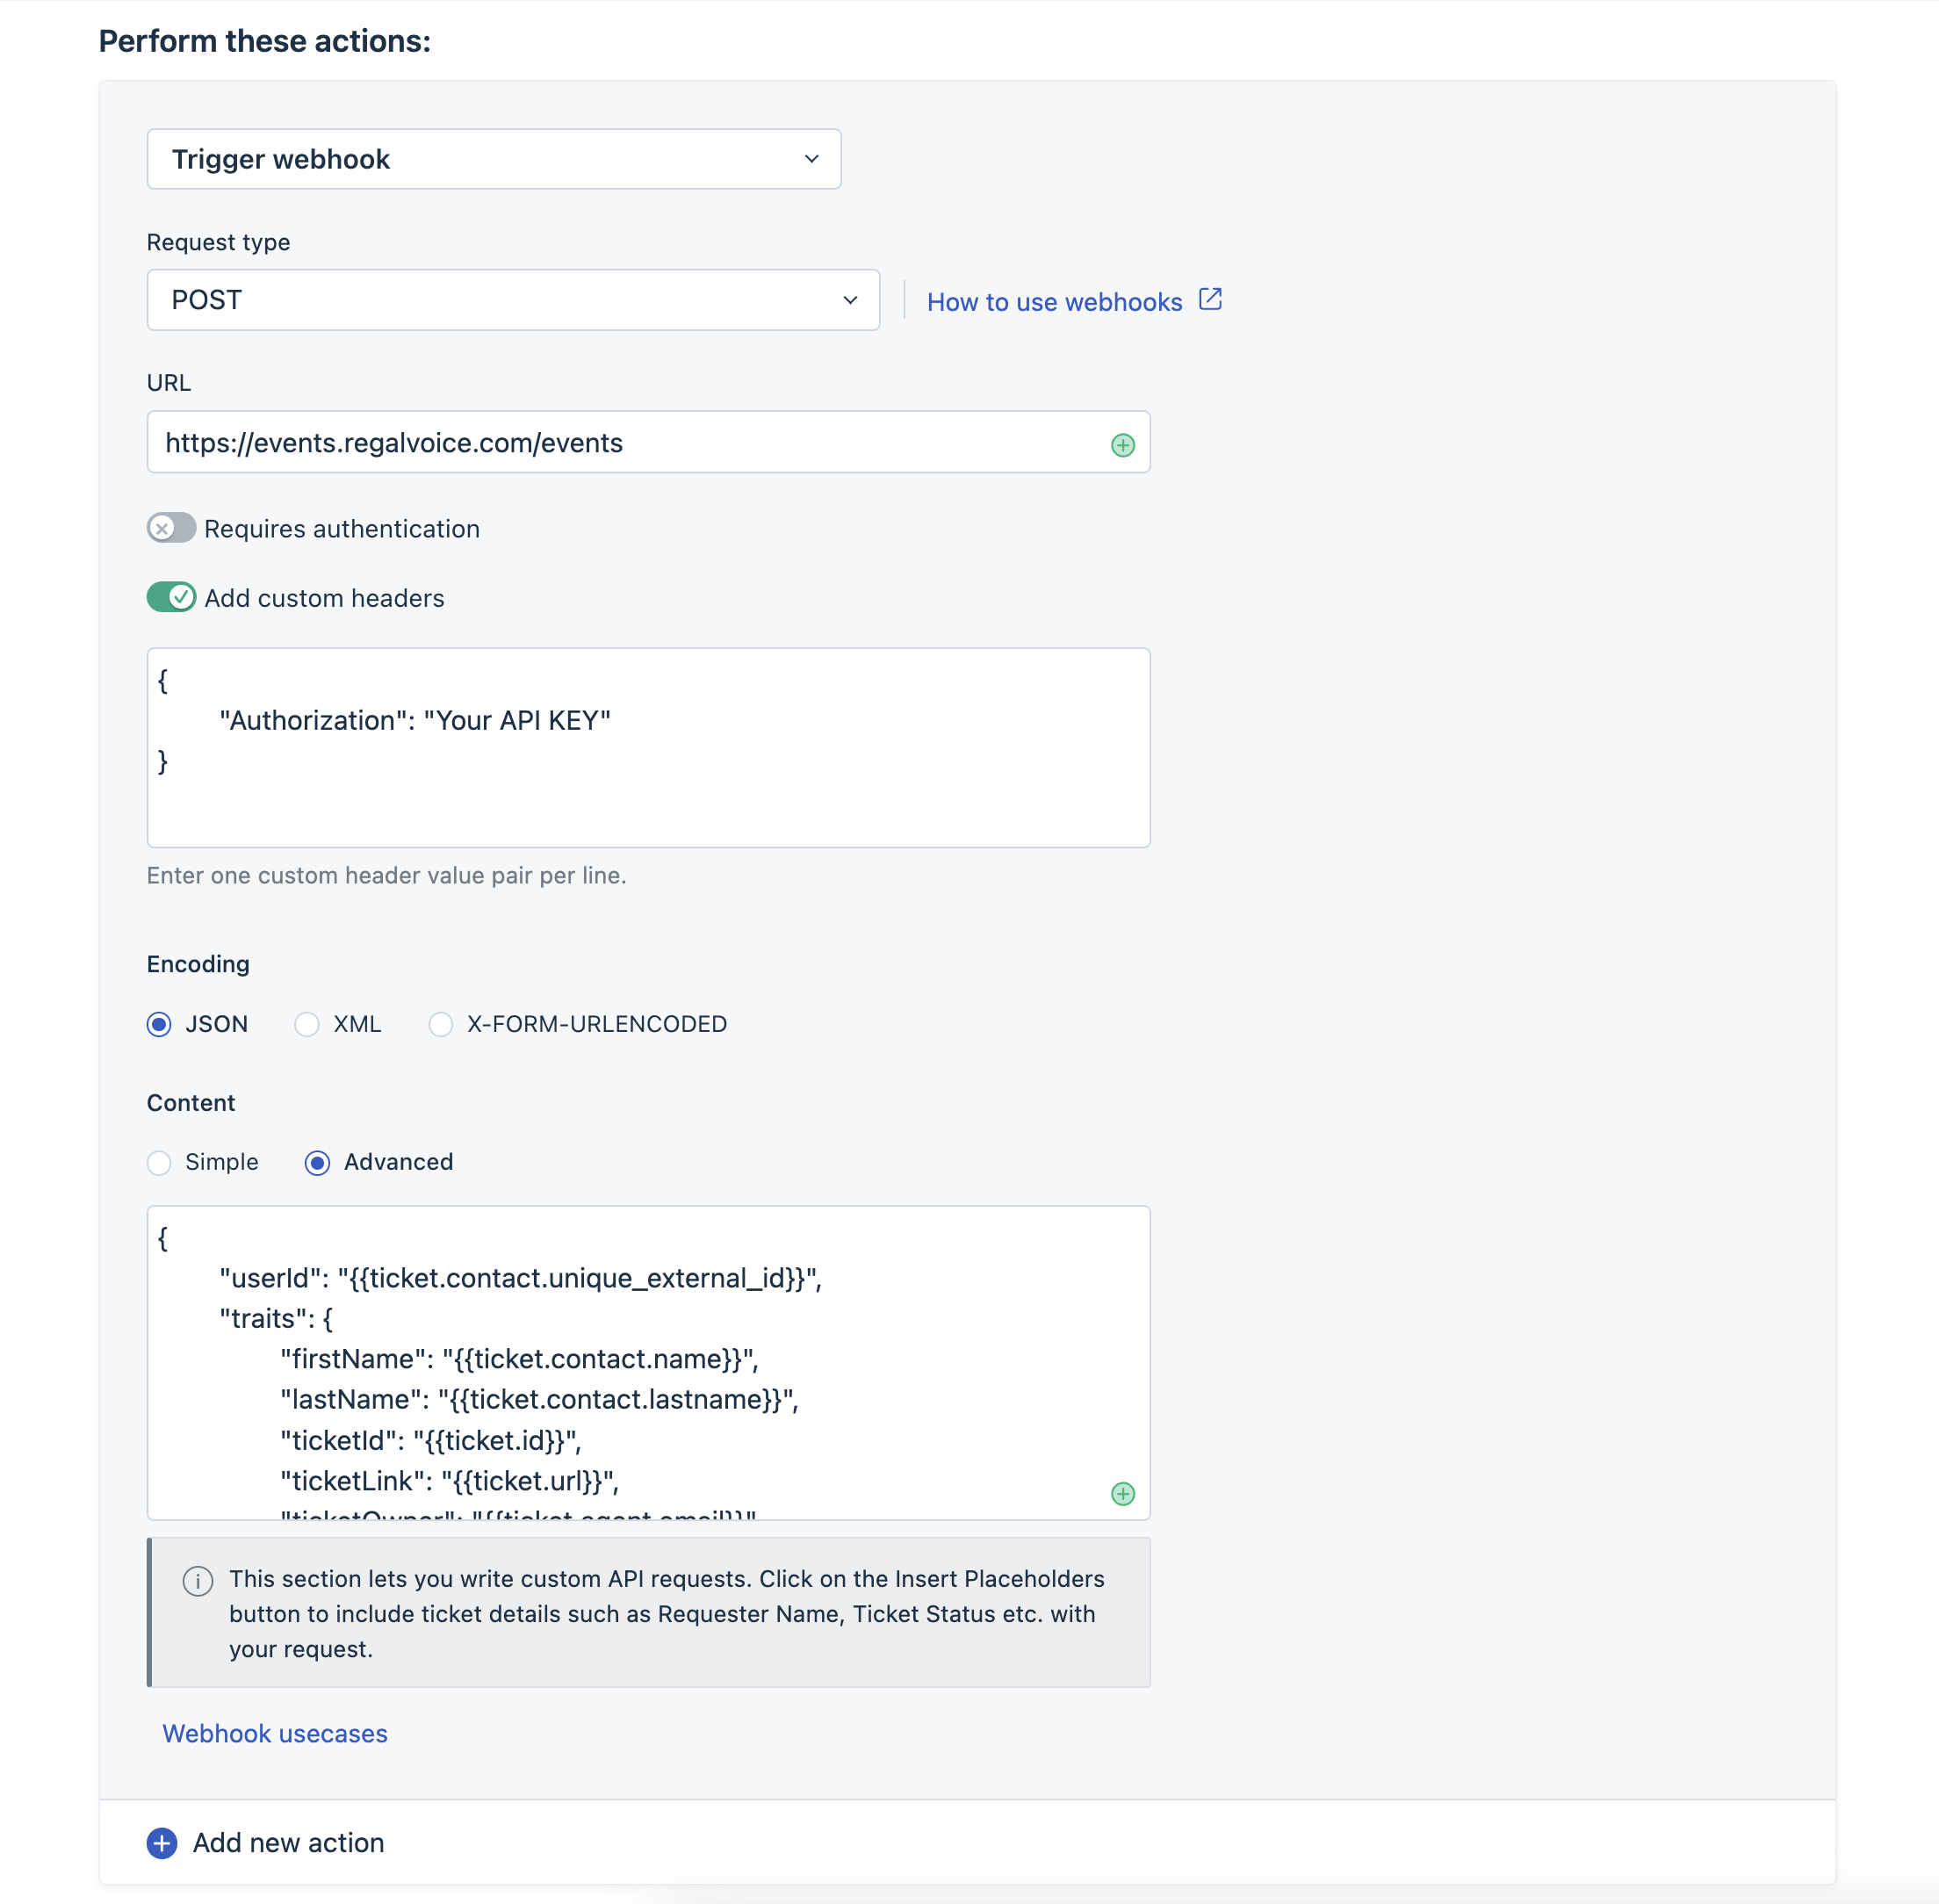
Next, we will choose "Add new action." In this instance, we will select the "Trigger webhook" action to send an event to Regal's Events API.
Configure Freshdesk webhook action
Request type: POST
URL: https://events.regalvoice.com/events
Requires authentication: False
Add custom headers; True
{"Authorization": "Your API KEY"}- API Key: YOUR API KEY (If you need your API email [email protected] or contact your implementation manager)
Encoding: JSON
Content: Advanced
API Request (Example Below): Event payload that will be sent to Regal's Events API, please refer to our Developer Docs for more information on Regal's support format. Note, click on the Insert Placeholders button to include ticket details such as Requester Name, Ticket Status etc. with your request.
Click "Preview & Save" to enable your automation.
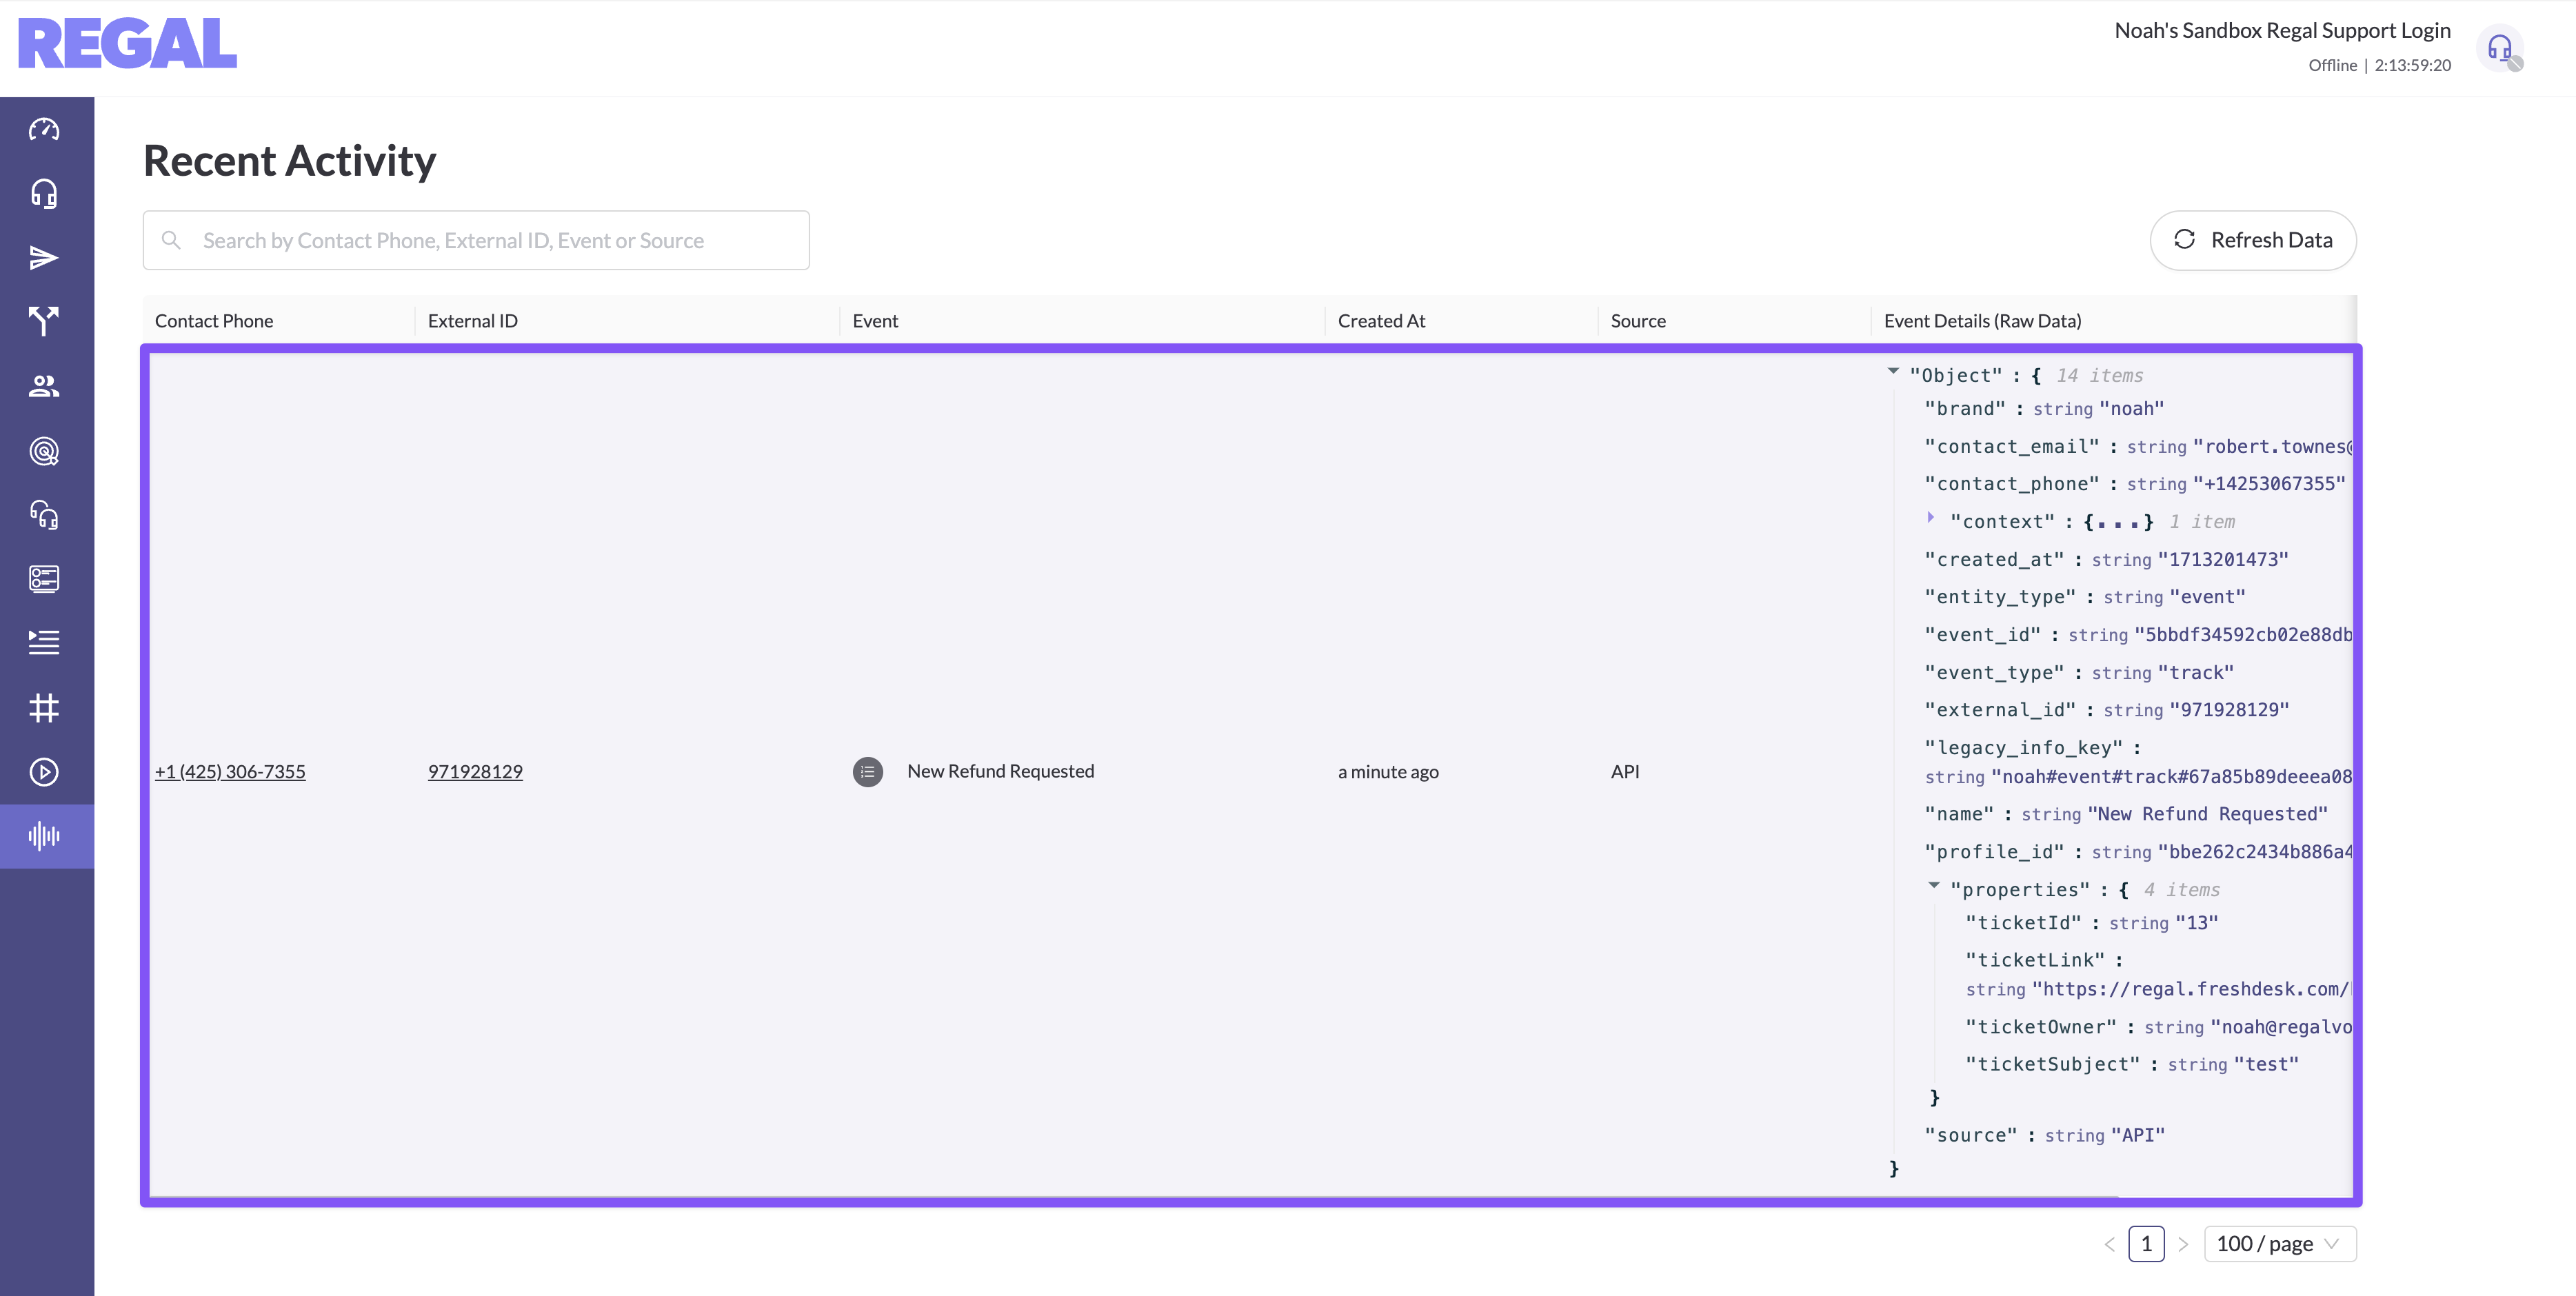
Create a test ticket with the relevant filters to ensure an event is sent to Regal.
Freshdesk Webhook Callback Request Limits:The number of webhook requests you can use in an hour is limited to 1000 calls. If the status codes are between 200 and 299, the callback is a success and status codes between 300-399 will be taken as callback redirects. When a callback fails (status codes other than 2xx and 3xx), the webhook will automatically be retried once every 30 minutes, totaling 48 calls. Calls requested after the rate limit will be buffered until fresh calls are available after 1 hour.
API Request Examples:
New Refund Ticket Created/Request
{
    "userId": "{{ticket.contact.unique_external_id}}",
    "traits": {
        "firstName": "{{ticket.contact.name}}",
        "lastName": "{{ticket.contact.lastname}}",
        "ticketId": "{{ticket.id}}",
        "ticketLink": "{{ticket.url}}",
        "ticketOwner": "{{ticket.agent.email}}",
        "ticketSubject": "{{ticket.subject}}",
        "emails": {
            "{{ticket.contact.email}}": {
                "emailOptIn": {
                    "subscribed": true
                }
            }
        },
        "phones": {
            "{{ticket.contact.phone}}": {
                "isPrimary": true,
                "label": "Main Phone",
                "voiceOptIn": {
                    "subscribed": true
                },
                "smsOptIn": {
                    "subscribed": true
                }
            }
        }
    },
    "name": "New Refund Requested",
    "properties": {
        "ticketId": "{{ticket.id}}",
        "ticketLink": "{{ticket.url}}",
        "ticketOwner": "{{ticket.agent.email}}",
        "ticketSubject": "{{ticket.subject}}"
    }
}
DATA OUT
This section describes how to use Regal as a source for sending your customer profile and event data to Freshdesk using Regal Journey Webhooks.
Sending data from Regal to Freshdesk
Regal relies on Journey Webhooks to send data to the Freshdesk API. You can can find more information on Journey Webhooks in our knowledge hub.
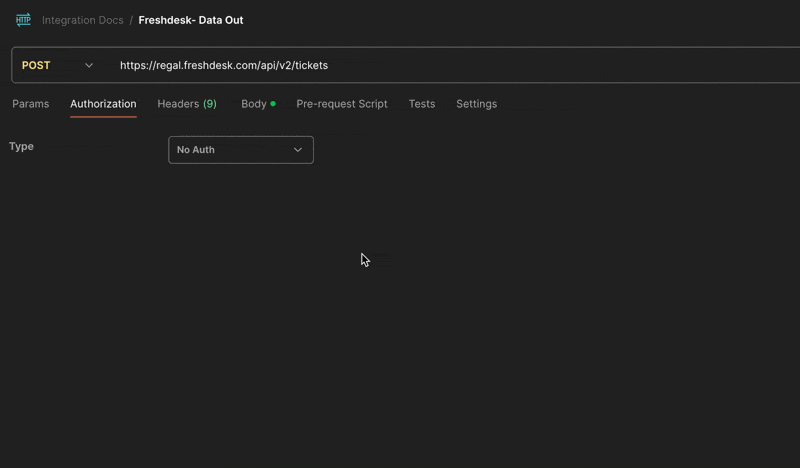
Please refer to the Freshdesk API Docs to find out all the possible ways to receive data. In this document, we'll be using the Ticketing API.
1) Create New Freshdesk API Key
Log in to your Freshdesk account.
Click on your profile picture on the top right and select 'Profile Settings.'
In the sidebar on the right, you will find the View API key button. To access the API key, click on it and complete the captcha verification.
Copy and store the key in a safe place for later use in Regal Journey Webhooks
Convert API Token to Basic Authorization using Postman
- Username: Freshdesk API Key
- Password: X
- There is no password, Freshdesk specifies you should put X
Copy Basic Authorization for use in the Regal Journey Webhook
2) Create Regal Journey
Navigate to Regal and create a new journey
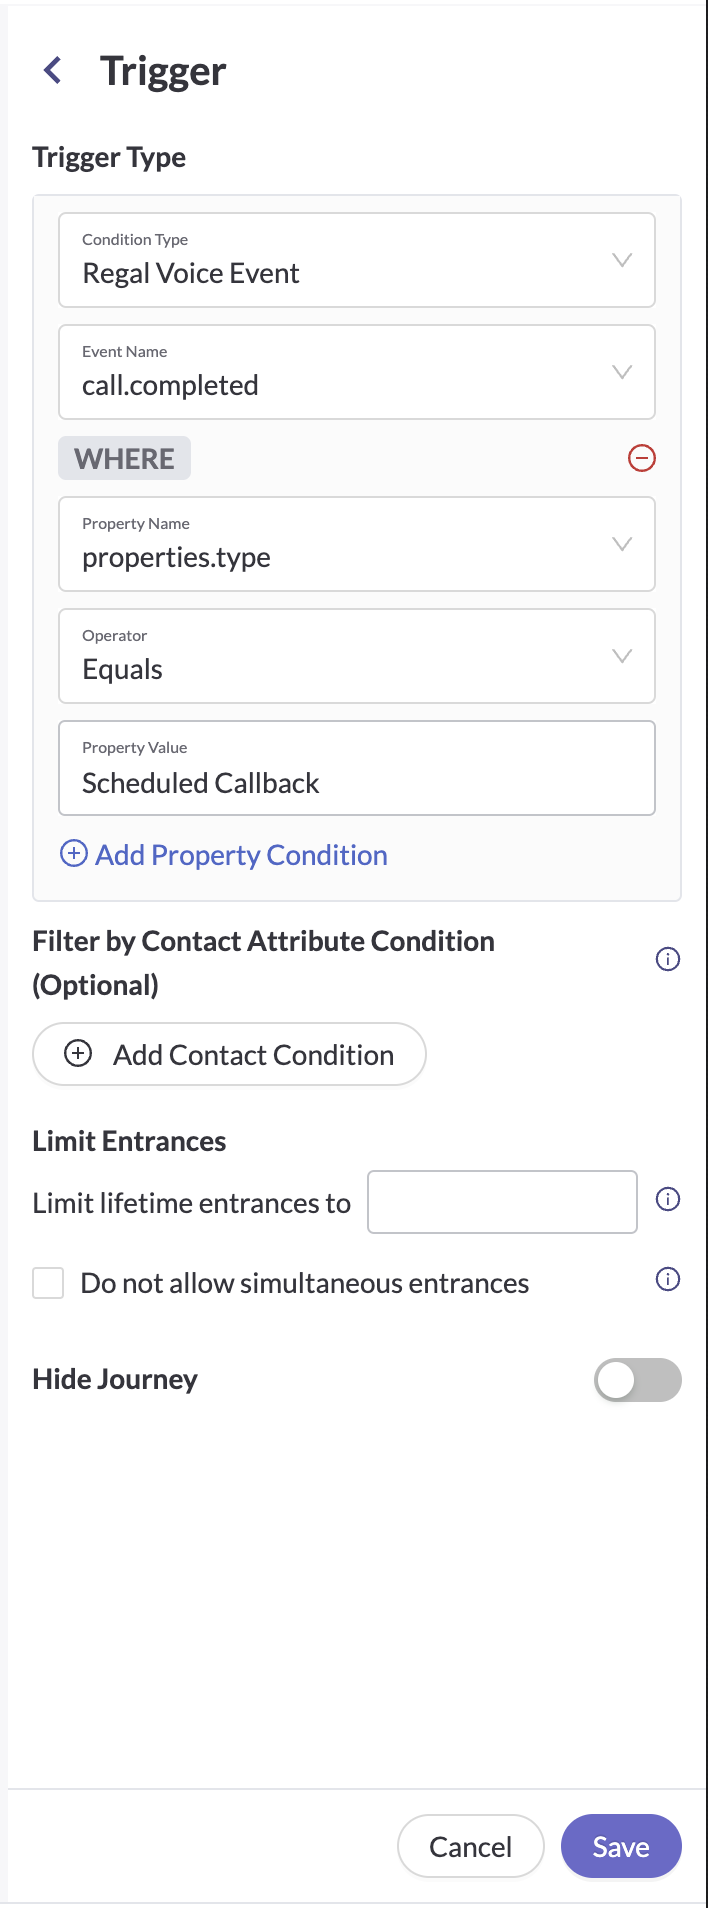
Name the journey, in this example we'll call it "Freshdesk: Regal Scheduled Callback Completed"
Specify the Trigging event for the journey which can be a Custom Event or a Regal Voice Event.
In this example we want to log a ticket in Freshdesk when a Regal Scheduled Callback is completed. The trigger will be a Regal Voice Event, call.completed within an additional Trigger filter when the Type of task is a "Scheduled Callback".
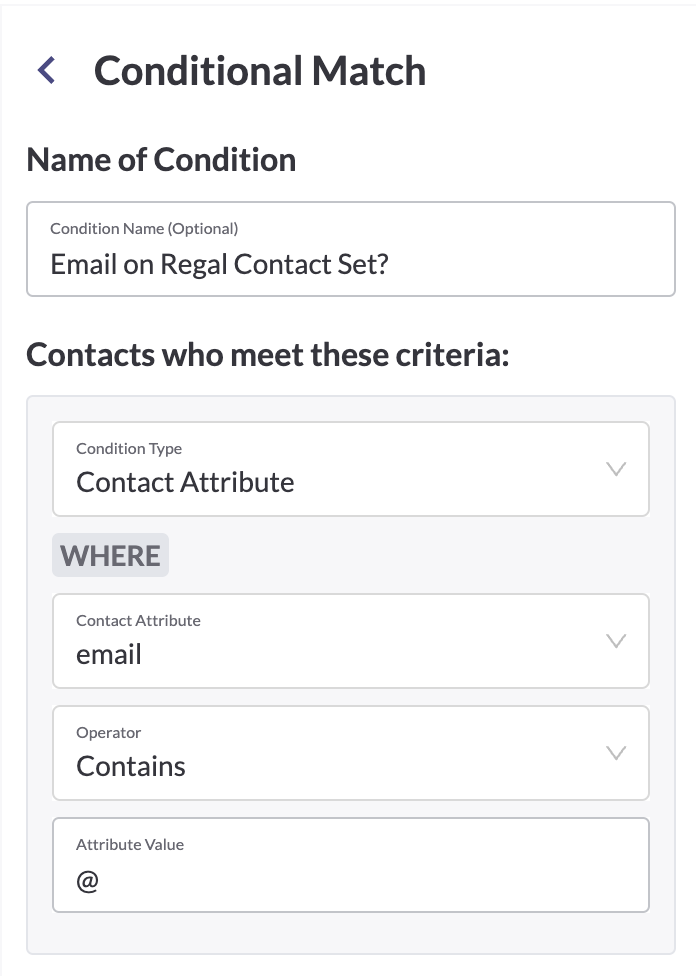
Before you create a ticket in Freshdesk using a Journey Webhook, its important we check to see if the Regal Contact's email is set since email is the primary identifier in Freshdesk.
Create Custom Journey Webhook
- Name (e.g. Freshdesk: Create Solved Ticket)
- Endpoint URL:
https://www.yoursubdomain.freshdesk.com/api/v2/tickets(e.g.https://regal.freshdesk.com/api/v2/tickets) - Custom Headers:
- Authorization: Basic Auth Postman
- Content-Type: application/json
- Accept: application/json
- JSON Payload Example:
{
"description": "{{event.properties.agent_fullname}} completed a scheduled call. Notes: {{event.properties.notes}}",
"subject": "Regal Scheduled Call Completed",
"email": "{{contact.email}}",
"priority": 1,
"status": 4,
"cc_emails": ["{{event.properties.agent_email}}"]
}

Test Integration by Trigging Journey to confirm you see a resolved ticket in Freshdesk

Updated 3 months ago